
I have been getting a lot of questions from friends on how to buy and safely store ether in Malaysia. I thought it would be helpful to write a step-by-step guide on buying and storing ether.
Ether is the token behind Ethereum, the second largest blockchain by market capitalisation after Bitcoin. Created by Vitalik Buterin when he was just 22 years old, Ethereum was designed to be a decentralized smart contracts platform that can run more complex computer code that Bitcoin could not.
Ethereum price has seen a massive price increase since its token sale (aka Initial Coin Offering) in July-August 2014. If you have purchased ether during the crowdsale, 1 bitcoin would have given you 2,000 ether which works out to an exchange rate of about 0.0005 BTC/ETH. Today (June 2017), ether is trading at around US$290 (roughly RM1,250) or roughly (0.1 BTC/ETH).

Step 1: Buy Bitcoin
The first step in acquiring ether is to first acquire bitcoin. You may buy bitcoin from these Bitcoin exchanges or marketplaces in Malaysia. There used to be two major exchanges which you can buy bitcoin in Malaysia - Luno and CoinHako. However, CoinHako has stopped its Malaysian operations from 10th February 2017 until further notice, so for the purposes of this guide, we will use Luno to acquire bitcoin.
Luno (previously known as BitX) is a Singapore-headquartered Bitcoin exchange that has received over US$4 million in venture capital funding. Luno started out in South Africa and is a Bitcoin exchange focused on developing markets. To begin, head to www.luno.com and create an account as usual.
Because bitcoin are financial assets, there is a certain amount of KYC/AML (Know-Your-Customer/Anti-Money-Laundering) procedures that you will need to undertake for Luno to identify you for legal purposes. There are three levels of verification on Luno that allows for different trading amounts.

Level 1 allows you to deposit and withdraw up to RM5,000 and is the default level that you will be placed after creating an account. To upgrade to Level 2 for deposits and withdrawals up to RM10,000, you need to submit a scanned copy of your MyKad, driving license or passport. To get to Level 3 and have deposits and withdrawals of up to RM300,000, you will need to submit a scanned copy of your proof of residence from your utility bill, bank statement or phone account.
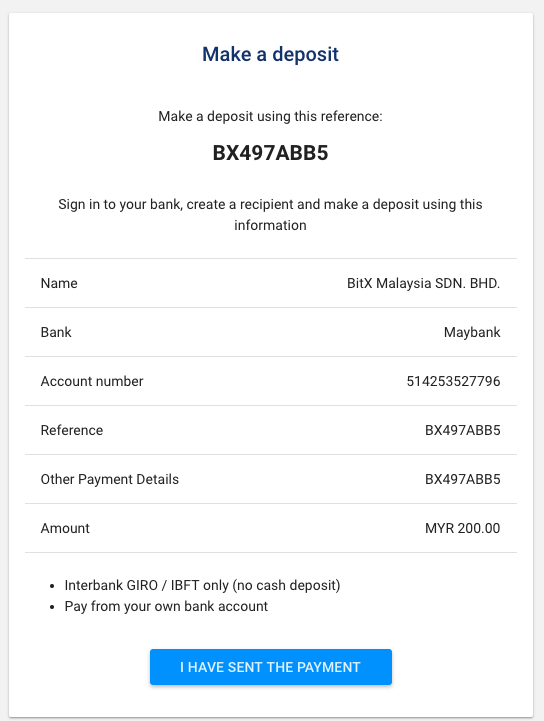
Once you have created your account, proceed to fund your Luno account by transferring some money to their bank account.

Luno has 2 bank accounts in Malaysia with Maybank and CIMB. You may do a GIRO or Instant Transfer to either of their bank accounts. You will need to quote their reference number in both “Recipient Reference” and “Other Payment Details” when you make your payment. Failure to do so may result in delays. Mark on Luno’s website that you have sent your payment after transferring the money.
Once Luno has verified that they have received your money (this process may take up to two business days), you may proceed to buy bitcoin from their trading platform. Luno has a full-suite trading engine that you can access but I do not like to use it as it can be very daunting with the candlestick chart and order book.

I prefer to use the Instant Buy feature where it is a lot easier. All I need to do is specify how many bitcoin I want to buy. Remember you can buy increments of bitcoins up to 8 decimal places. This means you can buy 0.01 BTC if you wish to.

This Instant Buy feature is not very clearly shown on Luno’s interface but you can see a small Buy/Sell Bitcoin price card on the homepage to access it.

Once you have purchased your bitcoin, you can proceed to create an Ethereum wallet before buying your ether.
Note: do store your bitcoin on a wallet where you control the private keys instead of an exchange like Luno as they may be susceptible to hacking attacks.
Step 2: Create Ether Wallet
There are several wallets that you can use to store your ether. There are several wallet types out there but I shall keep the discussion short and leave that for another article. In short, you want to have a wallet where you control the private keys to ensure safety of your ether. If you do not control the private keys, your coins are held by someone else and you risk having them disappear in the event of a hacking incident like Mt.Gox.
For ease of use, I recommend the MyEtherWallet online wallet because this online wallet service does not hold your private keys and your private keys does not leave your browser. The MyEtherWallet also does not require you to download the entire Ethereum blockchain to your computer and wait for it to sync. One last benefit is that the MyEtherWallet also supports Ethereum ERC20 tokens which are the hottest thing in town, mainly launched through token sales or more widely known as Initial Coin Offering (ICO).
I actually recommend that you use a Trezor or Ledger hardware wallet to go alongside MyEtherWallet for higher level of security but the hardware wallet will require some additional investments to purchase. You may read my review of Trezor and Ledger by clicking on the links.
To begin click creating a MyEtherWallet, click on the Generate Wallet link.

Enter a strong password to encrypt the Keystore file that will be generated. You will be greeted with the following screen next where you need to download the keystore file.
 After this page, you will be given the private keys to access your wallet. Do not disclose the private keys to anyone else or they will be able to take all your ether and there is no turning back as all blockchain transactions are irreversible.
When you use such a wallet, make sure you have your password, Keystore file, and private keys backed up properly. If you lose your password, Keystore file, or private keys you lose your ether forever - there is no Forget Password link because the private keys are never stored on MyEtherWallet’s servers and there is no customer support. Make sure you store them in an absolutely secure place off the internet.
Now that you have your created your Ethereum wallet, to access it, click on the Send Ether and Tokens link. Here, you can access it by selecting your Keystore file or by entering your private keys.

Once you have unlocked your wallet, you may see your Ethereum wallet address or public key in the red box highlighted below. The address looks something like this - 0x6fc1288F918013b76c6Fab186B6fb722E5Ee65a8 - and this string of random alphanumeric characters is what you will need to tell others to send ether to you.

If the above steps in creating an Ethereum wallet is too tough for you and you prefer absolute ease of use in lieu of security, you may consider using Coinbase. However, you must be aware that the private keys are held by Coinbase and you may be susceptible to losing your ether in the event that they are hacked. There is a Forget Password option and we recommend you to use two-factor authentication using Google Authenticator to increase the security of your account.
Step 3: Exchange Bitcoin for Ether
The next step in acquiring ether is to use an exchange like Shapeshift or Poloniex. If you are planning to acquire small amounts of Ether, you may consider using Shapeshift (max per exchange at this point in time is roughly 1.7 BTC or about RM20,000).
Select Bitcoin for Deposit and select Ether for Receive and hit the Continue button.

You will then need to key in your Ethereum address generated in Step 2 to receive the ether. Do also key in your Bitcoin wallet address in case this transaction fails. Hit the Start Transaction button.

You will then get a screen that looks something like this.

You need to head to your Bitcoin wallet and send the bitcoin over to the address as specified. Once Shapeshift has verified that they have received your bitcoin, they will exchange it for ether and send it to your Ethereum wallet. This whole process should take less than 10 minutes and you will get your ether in your Ethereum wallet in no time.
This is by far the easiest way to exchange Ethereum as you do not need to create another account at an exchange like Poloniex. The process for Poloniex requires you to register a new account, send bitcoin to their deposit address, wait for 3 or more Bitcoin confirmations (which takes at least 30 minutes or longer), head to the trading page and buy ether, withdraw ether to your Ethereum wallet, confirm withdrawal request via email, before finally receiving your ether in your Ethereum wallet.
Conclusion
This is roughly the process to acquire ether in Malaysia. If you have a Singapore bank account, I recommend using CoinHako because there is an option to buy ether directly from Singapore Dollars instead of buying bitcoin first. Until CoinHako becomes operational in Malaysia again, the above are the steps you will need to take to get hold of ether.
Hope this guide helps all of you with riding this ether bull run. If you have any questions, feel free to discuss at the comments section below.
Here is a live Ether price ticker in Malaysian Ringgit:


 Or check it out in the app stores

