
Dollar cost averaging is one of the simplest automated trading strategies. You set a fixed amount, buy on a schedule, and let time do the heavy lifting.
In this guide, we will build a minimal crypto dollar cost averaging (DCA) bot in Python that pulls prices from CoinGecko API, simulates buy orders, logs them to SQLite, and optionally adds a smarter rule based on moving averages. The resulting script is short, practical, and fully runnable, leaving a little room for you to tinker and expand its capabilities.

What Is a Crypto DCA Bot?
A crypto DCA bot is an automated trading tool that invests a fixed amount of money at regular intervals, regardless of market price. Instead of trying to time tops and bottoms, you buy a little bit every day, week, or month. Over time this tends to smooth out your average entry price, which is why DCA is popular with long-term investors and casual hobbyists.
The keyword here is automation. A bot removes the "should I buy today?" decision. It always executes the same rule, which helps avoid emotional swings and the common trap of buying only when the chart looks good. It also makes the process boring in a good way. That consistency is what makes DCA attractive for people who want exposure to Bitcoin or Ethereum without watching charts all day.
In this tutorial, we will build a personal tool for simulating a Dollar Cost Averaging (DCA) strategy. The tool does not connect to an exchange; it calculates potential buys and logs them, effectively operating as a paper trading system. This approach is ideal for beginners to safely simulate trades and test the logic. If you later choose to engage in live trading, you can connect the same core logic to an exchange's API.
Prerequisites
You do not need a huge stack for this. Keep it light and runnable.
-
Python 3.10+ installed
-
A CoinGecko API key. If you do not have one yet, follow this guide to get your free Demo API key. A Demo API key is sufficient for everything in this tutorial.
-
Basic familiarity with requests, environment variables, and scheduling
-
These packages installed:
pip install requests apscheduler python-dotenvWe will store your API key in a .env file (already in crypto_dollar_cost/.env) and load it securely at runtime. The full script we build is saved as dca_bot.py so you can run it immediately.
The script is designed to check for a Pro API Key first, and it falls back to your Demo key if necessary. Because both are loaded from the same .env file, you can smoothly upgrade your plan and handle higher volume requests without changing any underlying code.
Step 1: How to Fetch Real-Time Crypto Prices for Your DCA Bot
CoinGecko API uses coin IDs like bitcoin and ethereum instead of ticker symbols like BTC and ETH. That is why we start with a simple ID lookup. Then we call the /simple/price endpoint to pull current prices for multiple coins in one request. You can also request the 24-hour change in the same call, which will be useful later for "smart DCA" ideas.
Here is the minimal price fetcher. It resolves symbols to IDs using /coins/list, then calls /simple/price in a single request.
In the full script, the price map output is not just for debugging. It is also used to calculate units for each coin and decide whether to proceed or skip if a price is missing, making the bot resilient against wrong coin IDs or empty API data.
The only difference between the Demo and Pro API is the base URL and header name. The Demo plan uses the public base URL and a demo key header, while paid API plans require the Pro API base URL and a paid API Key. The core logic remains unchanged. We hide this configuration detail behind a simple switch in the final script, allowing you to follow the tutorial for free while supporting a production upgrade later. This "upgrade path" is beneficial if you scale the bot to handle multiple coins or higher frequency schedules.
In addition, there are two practical tips to keep in mind:
-
For faster execution, you can skip the symbol lookup and use CoinGecko IDs directly once you know them.
-
You should always request multiple coins in a single API call using a comma-separated list, as this safely keeps you under rate limits and simplifies your scheduling logic.
In the final script (dca_bot.py) we include the same logic with a retry wrapper and support for both Demo and Pro API keys.

Step 2: How to Implement the DCA Bot Buy Logic
Now that we can fetch prices, the buy logic is simple. Define your DCA parameters, calculate units, and simulate a buy. That is it. We are not placing real orders in this tutorial, which keeps the code safe, testable, and free from exchange-specific requirements.
Key parameters:
-
INVESTMENT_AMOUNT_USD: fixed amount per interval (example: $50)
-
TARGET_COINS: coin IDs (example: bitcoin, ethereum)
-
INTERVAL: daily or weekly schedule
The calculation is straightforward. The number of units equals the INVESTMENT_AMOUNT_USD divided by the current_price. Following this, we print a simulated order and record it to SQLite in Step 4.
As you build out your strategy, you will need to map out your design choices and decide whether the fixed investment amount should be applied per coin or per portfolio. In the snippet above, the bot spends the full INVESTMENT_AMOUNT_USD on each coin, which is simple and mirrors a "fixed-per-asset" DCA. If you prefer a "fixed total budget" per interval, you can split the amount across coins (for example, divide by the number of targets or apply weights like 70/30 for BTC/ETH). Both are valid. The important part is to pick one rule and stick to it consistently.
As a necessary reminder, this code is purely educational and does not constitute financial advice. This tutorial simulates orders and does not execute real trades. To transition to live trading, you would need to integrate with an exchange API and manage essential considerations like authentication, account balances, slippage, and order routing.
Step 3: How to Schedule Automated DCA Purchases
Automation is the whole point. For scheduling, APScheduler gives you a clean, cron-like interface without running a separate system service. You can schedule daily or weekly buys with a couple of lines.
Below is a simple scheduler setup that shows both daily and weekly options. In the full script, you can enable one schedule via the --schedule flag.
You probably only want one schedule in practice, but it is useful to see both patterns. The full script defaults to a single immediate run (so you can test without waiting), and you can switch to scheduled mode like this:
python dca_bot.py --schedule dailyRun example
From the repo root:
python crypto_dollar_cost/dca_bot.pyExpected output (example):

The numbers will change, but the flow should match. If you want it to keep running on a schedule, use the --schedule flag as shown above.
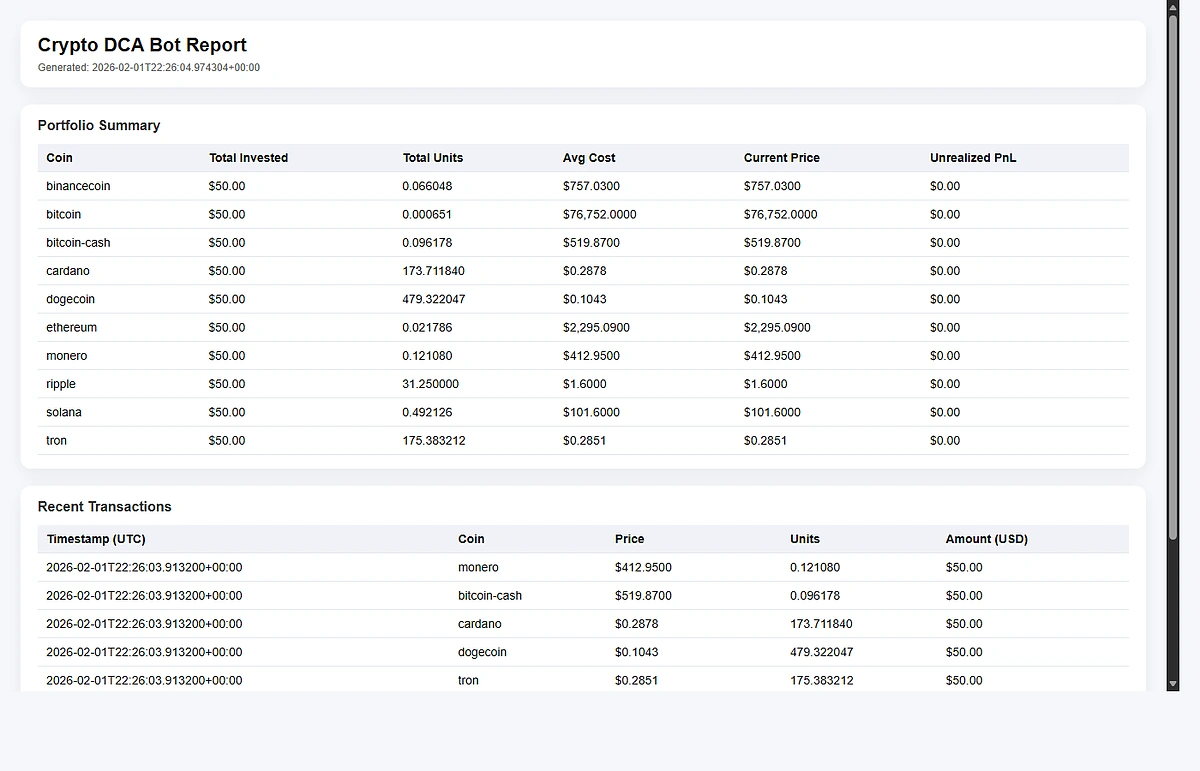
If you want something more visual, run python crypto_dollar_cost/dca_bot.py --once --report to generate crypto_dollar_cost/dca_report.html and a matching screenshot at crypto_dollar_cost/dca_report.png.
--once flag during testing to prevent accidental background scheduler execution.Step 4: Logging The Transaction Histories
A DCA bot is not very useful if you cannot track what you bought. We keep it simple with SQLite. It gives you a local database file, zero setup, and easy queries later.
We store each buy with the timestamp, coin ID, price, units, and USD amount. Then we can compute total invested, total units, average cost basis, and even unrealized PnL by comparing to the current price.
Here is a lightweight SQLite helper (adapted from the full script):
Now add a quick summary query and a basic unrealized PnL calculation using the /simple/price endpoint again:
In the full program, this runs right after each scheduled buy. Every execution appends a row per coin to transactions, then reads the table back to compute totals, average cost, and a quick unrealized PnL snapshot using the latest prices. The database is local, so your history stays in your control, and the design stays simple (one table, one insert per buy, one summary query). If the price API hiccups, the saved history is still intact.
While this does not provide a robust portfolio tracker, it answers the two most common questions that arise after a few weeks of utilizing a DCA strategy. It clarifies exactly how much capital you have invested and what your average cost basis is. From there you can expand into CSV exports, charts, or a lightweight dashboard.
Further Enhancements
The core bot logic above is intentionally simple. But once you have a baseline DCA running, you can experiment with "smart" adjustments. A popular, beginner-friendly strategy involves writing a dip-buying rule utilizing a moving average. For example, if the current market price drops a specific percentage below the 7-day Simple Moving Average (SMA), your bot could programmatically increase the buy size.
CoinGecko API offers various endpoints for accessing historical crypto data, including the historical price data available through the /coins/{id}/market_chart endpoint. An example of how to use this endpoint is:
https://api.coingecko.com/api/v3/coins/bitcoin/market_chart?vs_currency=usd&days=30This endpoint returns a list of [timestamp, price] pairs. Here is a minimal moving-average helper using only Python lists:
You can explore other strategies without changing the core architecture. With value averaging, you can increase buys when your portfolio falls below a target curve. If you want to manage exposure, you can set risk bands to reduce buys when volatility spikes or the 24-hour change is extreme. Finally, you can implement multi-coin balancing by splitting the fixed amount according to target weights instead of an equal allocation.
Note that these are optional and the core DCA flow works without any of these extras.
Get the Full Source Code
The complete, ready-to-run DCA bot is available in this GitHub repository.
To get started quickly, simply clone the repo, add your CoinGecko API key to a .env file, and start paper trading in minutes. The script includes all the features covered in this tutorial: price fetching, buy simulation, SQLite logging, scheduling, and the optional smart DCA logic.
Conclusion
You now have a working Dollar Cost Averaging bot in Python. It includes real price data, simulated buys, a scheduler, and a local transaction log. While simple, it covers all the core fundamentals such as fetching prices, calculating units, recording history, and evaluating performance over time. This is enough for a personal Dollar Cost Averaging system and provides a strong foundation for future automation.
If you want to take it one step further, build a lightweight portfolio tracker on top of the same SQLite data, or hook the bot into an exchange API for live trading. As your personal DCA bot usage scales, consider upgrading to a paid CoinGecko API plan to unlock higher rate limits, deeper historical market data, and advanced endpoints necessary to support a reliable production trading system.


 Or check it out in the app stores

