
X, otherwise better recognized as Twitter, is one of the leading platforms where the crypto community is most engaged. Serving as a hub for real-time updates, Twitter is often where the latest blockchain developments and news break. The emergence of crypto Twitter bots (X bots) have further enriched the user experience and play a crucial role in keeping users informed and engaged – offering a range of functionalities from tracking cryptocurrency price changes to delivering personalized content.
In today's tutorial, we'll cover how to build your own Twitter bot (X bot) that tweets crypto price updates. Specifically, we'll design a bot that will tweet the top 5 NFTs by trading volume, their respective floor price and 24-hour percentage change.
We'll be using the following APIs:
- CoinGecko API – We will be leveraging NFT data endpoints to get NFT collections' floor prices.
- Twitter API v2 library – This is the required code library that allows us to connect to Twitter and tweet.

How to Build A Crypto Price Twitter Bot (4 Steps)
We'll be creating a Twitter bot using Javascript, with minimal coding knowledge needed. Here's a quick overview of the steps:
- Get NFT data from CoinGecko API.
- Create a tweet function.
- Consolidate in one main() function.
- Deploy on server and schedule automation.
Let’s dive in!
For the ease of demonstration, we'll be referencing the platform Twitter and X interchangeably.
Prerequisites and Packages to Install
For this tutorial, you’ll require the following libraries installed:
- axios
- twitter-api-v2
- cron
You can install them by typing the following command in your terminal after you have created an npm repository.
npm install axios twitter-api-v2
Step 1: Get NFT Data from CoinGecko API
We'll first navigate to the CoinGecko API documentation. The following two endpoints will allow us to retrieve the relevant NFT data points:
- /nft/list – Get the top 5 NFT collections based on 24-hour trading volume in USD.
- /nfts/{id} – Get the individual floor price and percentage (%) change for each NFT, using the ids of the NFTs from (1).
First, we define an array NftData which will store all the required data (such as price, % change, and name) in a global scope so that other functions can access it.
let NftData = [];
The array should look like this once populated.
[
{
name: 'Bored Ape Yacht Club',
floor_price: 26.7,
native_currency_symbol: 'ETH',
floor_price_24h_change: 1.3282732447817835
},
{
name: 'Pudgy Penguins',
floor_price: 10.67,
native_currency_symbol: 'ETH',
floor_price_24h_change: -0.6335010247810696
}
]
Then, we create a getTopNFT function to execute the API calls. Here’s a walkthrough of the code.
- We define a local array topNFT to store our top 5 NFTs so that we can loop through to get each NFT's price data.
- The first call is to /nfts/list to obtain the current top 5 NFTs by USD trading volume. To filter this we pass in the parameters
- order=h24_volume_usd_desc
- per_page=5
- page=1
- We then save the 5 NFT ids in the topNFT array.
- The second call is made to /nfts/{id} to get the name, price, symbol, and 24H change of each NFT. We nest this in a for loop so that we can get the data for all 5 NFTs.
- We then save them into the NftData array.
async function getTopNFT() {
let topNFT = [];
const url = 'https://api.coingecko.com/api/v3/nfts/list?order=h24_volume_usd_desc&per_page=5&page=1';
await axios.get(url)
.then(function (response) {
topNFT = topNFT.concat(response.data.map(key => key.id));
})
.catch(function (error) { console.log(error) })
console.log(topNFT);
for (let i = 0; i < topNFT.length; i++) {
const url2 = 'https://api.coingecko.com/api/v3/nfts/' + topNFT[i];
await axios.get(url2)
.then(function (response) {
var x = response.data;
NftData.push({
"name": x.name,
"floor_price": x.floor_price.native_currency,
"native_currency_symbol": x.native_currency_symbol,
"floor_price_24h_change": x.floor_price_24h_percentage_change.native_currency
});
})
.catch(function (error) { console.log(error) })
}
}
Step 2: Create A Tweet Function
Let's start with initializing a Twitter client, using the following code:
const twitterApi = require('twitter-api-v2');
// Initialize Twitter API client
const twitterClient = new twitterApi.TwitterApi({
appKey:'your-app-key',
appSecret:'your-app-secret',
accessToken: 'your-access-token',
accessSecret:'your-access-secret',
});
// Read+Write level
const rwClient = twitterClient.readWrite;
To tweet programmatically you will need to create a Twitter developer account, which will give you the credentials like appKey.
Once you enter the portal, create a project and an app under the project. Click on the project page and you will see the ‘App’ section. Simply click on the key icon here.
In the next page, copy the following credentials (we have additionally indicated which field they should be mapped to as well).
- Consumer keys
- API credentials - this is appKey
- API secret - this is appSecret
- Authentication keys
- Access token - this is accessToken
- Access secret - this is accessSecret
After getting hold of the credentials, it’s time to create our tweet function! Here’s a quick explainer for the code:
All the action happens in the try block. The function should accept an input logMessages which contains an array with each element representing a line of NFT price data.
async function tweetNFTPrices(logMessages) {
try {
} catch (error) {
console.error('Error posting tweet:', error);
}
}
We first check if logMessages is being passed in and it contains at least one element.
if (logMessages && logMessages.length > 0) {
}
Next, we format the tweet by adding a header and footer.
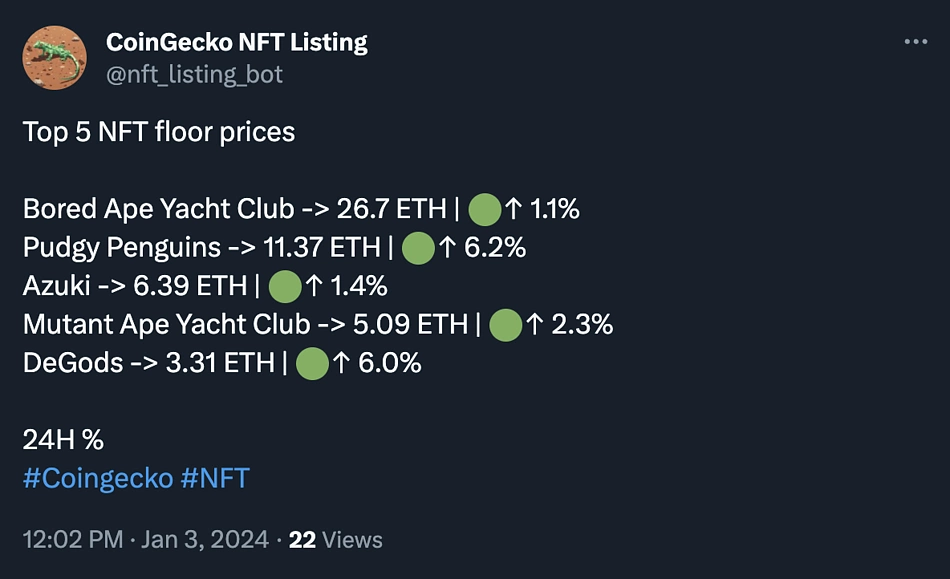
For reference, here’s the final message we will be constructing, and in brackets are their references in the code.
Top 5 NFT floor prices
(logMessageArray)
Bored Ape Yacht Club -> 26.7 ETH | 🟢↑ 1.1%
Pudgy Penguins -> 11.37 ETH | 🟢↑ 6.2%
Azuki -> 6.39 ETH | 🟢↑ 1.4%
Mutant Ape Yacht Club -> 5.09 ETH | 🟢↑ 2.3%
DeGods -> 3.31 ETH | 🟢↑ 6.0%
(Footer)
24H %
#Coingecko #NFT
const header = 'Top 5 NFT floor prices'; // Define your header here
const footer = '\n\n24H %\n#Coingecko #NFT '; // Define your footer here
The following code constructs the tweet in a for loop, adding every line of NFT data to the tweet and stops if it exceeds the tweet character limit. If it stops, the code continues and the tweet text will be up until the point before it stops.
// Join log messages while considering character limit
let combinedLogMessages = `${header}\n\n`;
let currentLength = combinedLogMessages.length;
const maxTweetLength = 280; // Maximum characters for a tweet
for (const message of logMessages) {
if (currentLength + message.length + footer.length <= maxTweetLength) {
combinedLogMessages += `${message}\n`;
currentLength += message.length;
} else {
break; // Break loop if exceeding character limit
}
}
It then combines with the footer.
combinedLogMessages += footer;
Finally, it sends out the tweet with the rwClient.v2.tweet function. The message should be passed in the text field in the object. Remember to add await as it is an asynchronous function.
await rwClient.v2.tweet({
text: combinedLogMessages,
});
Putting everything together, the tweetNFTPrices function should look like the following.
async function tweetNFTPrices(logMessages) {
try {
if (logMessages && logMessages.length > 0) {
const header = 'Top 5 NFT floor prices'; // Define your header here
const footer = '\n\n24H %\n#Coingecko #NFT '; // Define your footer here
// Join log messages while considering character limit
let combinedLogMessages = `${header}\n\n`;
let currentLength = combinedLogMessages.length;
const maxTweetLength = 280; // Maximum characters for a tweet
for (const message of logMessages) {
if (currentLength + message.length + footer.length <= maxTweetLength) {
combinedLogMessages += `${message}\n`;
currentLength += message.length;
} else {
break; // Break loop if exceeding character limit
}
}
combinedLogMessages += footer;
await rwClient.v2.tweet({
text: combinedLogMessages,
});
console.log('Tweeted the post:', combinedLogMessages); //You can print it in console for cross checking
} else {
console.error('Error: logMessages array is empty or undefined.');
}
} catch (error) {
console.error('Error posting tweet:', error);
}
}
With that, you are one step away from being able to tweet your crypto price updates from the code!
Step 3: Consolidate in One Main() Function
The main() function consolidates and executes all the steps above, namely, it gets the necessary price data, formats it, and then tweets it out. Let’s break it down, step-by-step.
First, we call getTopNFT() to fetch the NFT data.
//Get the data
await getTopNFT();
Then, with the necessary NFT data now populated in the NftData array, we will further format it and save it into a logMessagesArray array.
For each NFT (using a for loop), trim the 24H floor price change to 1 decimal place.
const formattedChange = parseFloat(floor_price_24h_change).toFixed(1);
Depending on the 24H change, add green/red/black emoji and up/down arrow for better visualization.
if (floor_price_24h_change > 0) {
changeSymbol = '🟢\u{2191}'; // Green arrow up emoji
} else if (floor_price_24h_change < 0) {
changeSymbol = '🔴\u{2193}'; // Red arrow down emoji
} else {
changeSymbol = '⚫️'; // Black circle emoji for no change
}
Construct the final form of each NFT price data line into 'Bored Ape Yacht Club -> 26.7 ETH | 🟢↑ 1.13%' and add it to the logMessagesArray array.
const logMessage = `${name} -> ${floor_price} ${native_currency_symbol} | ${changeSymbol} ${formattedChange}%`;
logMessagesArray.push(logMessage); // Push each log message to the array
Finally, pass logMessagesArray into the tweetNFTPrices function that we created in step 2. It will then fire the tweet out and violà - you have made your twitter bot tweet!
try {
await tweetNFTPrices(logMessagesArray);
} catch (error) {
console.error('Error posting tweet:', error);
}
Here’s the amalgamation of the function.
async function main() {
//Get the data
await getTopNFT();
//Format tweet
const logMessagesArray = [];
for (let i = 0; i < NftData.length; i++) {
const { name, floor_price, native_currency_symbol, floor_price_24h_change } = NftData[i];
let changeSymbol = '';
// Limiting floor_price_24h_change to 1 decimal place
const formattedChange = parseFloat(floor_price_24h_change).toFixed(1);
if (floor_price_24h_change > 0) {
changeSymbol = '🟢\u{2191}'; // Green arrow up emoji
} else if (floor_price_24h_change < 0) {
changeSymbol = '🔴\u{2193}'; // Red arrow down emoji
} else {
changeSymbol = '⚫️'; // Black circle emoji for no change
}
const logMessage = `${name} -> ${floor_price} ${native_currency_symbol} | ${changeSymbol} ${formattedChange}%`;
logMessagesArray.push(logMessage); // Push each log message to the array
}
console.log(logMessagesArray); // Log the entire array after the loop finishes
//Tweet it out
try {
await tweetNFTPrices(logMessagesArray);
} catch (error) {
console.error('Error posting tweet:', error);
}
}
Step 4: Deploy on Server and Schedule Automation
Lastly, to run the script regularly at a set interval without having to manually trigger it every time, we will need to deploy it to a server and set up a scheduler.
Install the node-cron package if you haven't already:
npm install node-cron
To run this script every 00:00 of the day, we can simply wrap this around main().
// Schedule the script to run every 24 hours
cron.schedule('0 0 * * *', async () => {
console.log('Running script every 24 hours...');
try {
await main(); // Call your main function here
} catch (error) {
console.error('Error running main function:', error.message);
}
});
Here is another example if you want to run it every 5 minutes, although this is not recommended, because we should not be posting duplicate content on Twitter/X.
// Wrap your main function call in a cron job that runs every 5 minutes
cron.schedule('*/5 * * * *', async () => {
console.log('Running script every 5 minutes');
try {
await main(); // Call your main function here
} catch (error) {
console.error(error.message);
}
});
}
To run the script remotely, you can deploy this script to any cloud server based on your preferences. There are several options available, from self-managed servers such as AWS EC2, GCP, Digital Ocean, and Linode to Platform as a Service PaaS like Heroku, Azure or AWS Elastic Beanstalk that offer simplified deployment workflows. Moreover, you can also use screen session to run your script at the background of your Virtual Private Server.
To run the script locally, simply enter the following command in your terminal:
node your_script_name.js
Here’s the script putting everything together from the start for your reference.
const axios = require('axios');
const twitterApi = require('twitter-api-v2');
const cron = require('node-cron');
// Initialize Twitter API client
const twitterClient = new twitterApi.TwitterApi({
appKey:'your-app-key',
appSecret:'your-app-secret',
accessToken: 'your-access-token',
accessSecret:'your-access-secret',
});
// Read+Write level
const rwClient = twitterClient.readWrite;
// Json array to store NFT data such as price, % change
let NftData = [];
async function getTopNFT() {
let topNFT = [];
const url = 'https://api.coingecko.com/api/v3/nfts/list?order=h24_volume_usd_desc&per_page=5&page=1';
await axios.get(url)
.then(function (response) {
topNFT = topNFT.concat(response.data.map(key => key.id));
})
.catch(function (error) { console.log(error) })
console.log(topNFT);
for (let i = 0; i < topNFT.length; i++) {
const url2 = 'https://api.coingecko.com/api/v3/nfts/' + topNFT[i];
await axios.get(url2)
.then(function (response) {
var x = response.data;
NftData.push({
"name": x.name,
"floor_price": x.floor_price.native_currency,
"native_currency_symbol": x.native_currency_symbol,
"floor_price_24h_change": x.floor_price_24h_percentage_change.native_currency
});
})
.catch(function (error) { console.log(error) })
}
}
async function tweetNFTPrices(logMessages) {
try {
if (logMessages && logMessages.length > 0) {
const header = 'Top 5 NFT floor prices'; // Define your header here
const footer = '\n\n24H %\n#Coingecko #NFT '; // Define your footer here
// Join log messages while considering character limit
let combinedLogMessages = `${header}\n\n`;
let currentLength = combinedLogMessages.length;
const maxTweetLength = 280; // Maximum characters for a tweet
for (const message of logMessages) {
if (currentLength + message.length + footer.length <= maxTweetLength) {
combinedLogMessages += `${message}\n`;
currentLength += message.length;
} else {
break; // Break loop if exceeding character limit
}
}
combinedLogMessages += footer;
await rwClient.v2.tweet({
text: combinedLogMessages,
});
console.log('Tweeted the post:', combinedLogMessages);
} else {
console.error('Error: logMessages array is empty or undefined.');
}
} catch (error) {
console.error('Error posting tweet:', error);
}
}
async function main() {
//Get the data
await getTopNFT();
//Format tweet
const logMessagesArray = [];
for (let i = 0; i < NftData.length; i++) {
const { name, floor_price, native_currency_symbol, floor_price_24h_change } = NftData[i];
let changeSymbol = '';
// Limiting floor_price_24h_change to 1 decimal place
const formattedChange = parseFloat(floor_price_24h_change).toFixed(1);
if (floor_price_24h_change > 0) {
changeSymbol = '🟢\u{2191}'; // Green arrow up emoji
} else if (floor_price_24h_change < 0) {
changeSymbol = '🔴\u{2193}'; // Red arrow down emoji
} else {
changeSymbol = '⚫️'; // Black circle emoji for no change
}
const logMessage = `${name} -> ${floor_price} ${native_currency_symbol} | ${changeSymbol} ${formattedChange}%`;
logMessagesArray.push(logMessage); // Push each log message to the array
}
console.log(logMessagesArray); // Log the entire array after the loop finishes
//Tweet it out
try {
await tweetNFTPrices(logMessagesArray);
} catch (error) {
console.error('Error posting tweet:', error);
}
}
// Schedule the script to run every 24 hours
cron.schedule('0 0 * * *', async () => {
console.log('Running script every 24 hours...');
try {
await main(); // Call your main function here
} catch (error) {
console.error('Error running main function:', error.message);
}
});
The Final Product: Crypto Price Twitter Bot
In 4 easy steps, we have created an automated crypto price Twitter or X bot that tweets the current top 5 NFT Collections by trading volume, with each of their floor prices and percentage price change (see it in action on Twitter/X: https://twitter.com/nft_listing_bot).
Potential Enhancements & Pro-Tips
For ease of this tutorial, we've created a simplified crypto price Twitter/X bot. However here are some potential improvement areas:
-
Work around Twitter/X's character limit by construct a tweet thread. The character limit for a single tweet might be busted in the event of one or several long NFT names resulting in the tweet being cut off. As a potential enhancement, you can also check the character limit and use the tweetThread method to post it as a thread. This ensures that you always get to post the entire NFT data without the inhibition of character limit.
- Use a paid exclusive CoinGecko API endpoint to make API calls more efficient. This tutorial makes 6 calls to 2 different API endpoints that are publicly accessible. Alternatively, you can actually get the same data using the NFTs List with Market Data endpoint, available on our paid plan.

Conclusion
With the right APIs, building a Twitter bot or X bot is a lot simpler than it sounds – even for individuals with minimal coding knowledge. To sum, the process involves retrieving crypto price data from the CoinGecko API, establishing a tweet function, consolidating functionalities within a main() function, and finally, deploying the bot on a server with the capability to schedule automation. This process can be further replicated with other endpoints to create different types of Twitter or X bots that tweet varying data.
This article was co-written by Alan and Tiong Woon.


 Or check it out in the app stores

