
In many cases, a honeypot token doesn't need to explicitly disable the sell function to trap your funds. It can also trap funds by retaining mint authority and continuously diluting the token value, or by having no available liquidity, making selling impossible. These scenarios must also be considered when evaluating whether a token is a honeypot.
In this article, we’ll show you what goes into building a honeypot checker from scratch and how you can skip some of the heavy lifting with the CoinGecko API. Detecting honeypots requires multiple on-chain checks, and the complexity grows quickly when supporting multiple chains, each with its own RPC endpoints, token standards, and liquidity protocols. The CoinGecko API simplifies this process by providing security and liquidity data, including mint authority, freeze authority and more, across 200+ networks and over 1,500 DEXs, all in one API.
Prerequisite
- CoinGecko API
- Node.js and npm
- Installing Node.js and npm
- Solana RPC Gateway
- Some knowledge of JavaScript and TypeScript (optional)
Let’s go ahead and install these requirements.
Installing Node.js and npm
The easiest way to install Node.js and npm is to run the following commands from your command prompt or terminal window:
Obtaining a CoinGecko API Key
To obtain a CoinGecko API key, head over to the Developer’s Dashboard and click on +Add New Key in the top right corner. For detailed instructions on generating and setting up your key, refer to this guide.

For the second part of this guide, we’ll use the CoinGecko API to easily filter out honeypot traps. This endpoint is available on the Analyst tier and above.
Obtaining an RPC Gateway URL
An RPC gateway URL is an endpoint that lets your application communicate with the blockchain. It allows you to send requests such as fetching account information, simulating transactions, or querying token data.
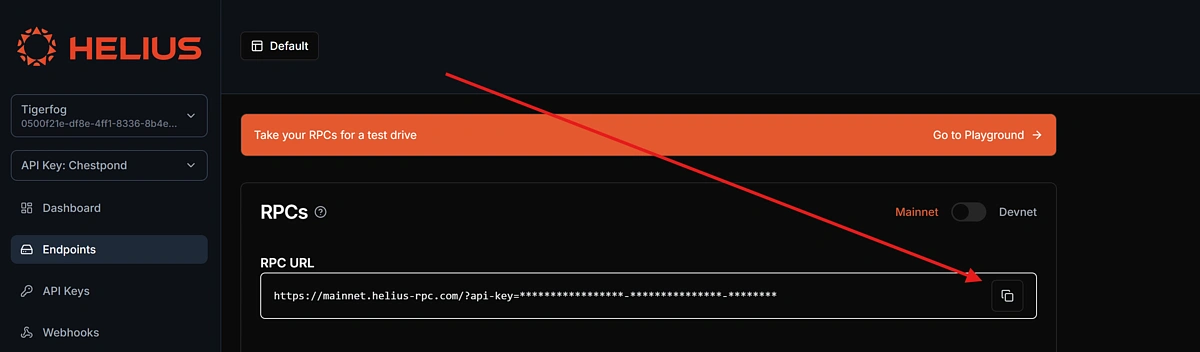
Since we'll be building a honeypot checker for Solana, we're going to use Helius as our RPC provider.
Go ahead and create a free account on helius.dev, navigate to Endpoints on the left-hand panel, and make a note of the RPC URL.
Build a Honeypot Checker from Scratch
Detecting whether a token on Solana is a honeypot requires a combination of checks that, when combined, can reveal suspicious or outright malicious behaviour. In this section, we’ll define the scope of our application and walk through the various red flags we’ll be checking for.
To build a reliable honeypot checker, we perform three key types of analysis:
Token Mint Authority Audit
One of the most common ways developers rug users is by retaining control over the minting or freezing of tokens. If the token creator hasn’t revoked their mint authority, they could potentially mint unlimited new tokens, diluting value or manipulating supply. Similarly, if the freeze authority is still active, they could freeze user wallets at any time. These are major red flags for new or unknown tokens.
Program Ownership Verification
Every token on Solana is governed by a program (essentially, a smart contract). For legitimate tokens, this should always be the official SPL Token Program. If a token is governed by a custom or unknown program, it could contain hidden logic that enables honeypot behaviour, like blocking transfers or overriding balances.
Sell Route Simulation
A token that you can buy but can’t sell is the very definition of a honeypot. To test this, we simulate a “sell” through Jupiter, Solana’s leading DEX aggregator. If we can’t get a quote, or if the output amount doesn’t make sense based on the expected price and slippage, that’s another major red flag. It may mean there’s no real liquidity, or that selling is intentionally disabled.
In either scenario, you’d likely be stuck with a worthless coin, so it’s a strong indicator that it’s a honeypot, a dead coin, or a rug pull.
Initializing the application
The first thing we need to do is create an empty root directory, navigate inside the directory, and initialize a new npm project.
Next, we’re going to install and configure TypeScript:
This should create a new file called tsconfig.json in your root directory. Let’s configure TypeScript for our project:
Once Typescript is configured, make sure to add "type": "module" inside package.json, under version, otherwise you may get compilation errors when executing the code.
Installing Dependencies
Using npm, install the following dependencies for your project:
With the dependencies installed, let’s go ahead and create the entry point for our application under src/index.ts. Note that you will need to create the directory as well as the file.
Defining constants and types
When working with blockchain projects, it’s quite common to store some of your most commonly used token addresses under a file called constants. Under ./src, create a new file called Constants.ts:
Here is where we’ll be storing our RPC_URL as well as the USDC contract address on Solana.
Under /src create a new folder called types. Inside this folder, we’re going to create two files: price.ts and route.ts. This is where we define the responses that we receive from the Jupiter Quote and Price APIs, so we can easily use these objects in our code.
Inside price.ts, the type should look like this:
Inside PriceDataMap, we have a nested object where the key is a string representing the token’s contract address. This key isn’t explicitly defined in advance because Jupiter’s price API dynamically uses the token’s address as the key name.
Inside route.ts define the quote response. This is the response that we expect to receive for a token that has a valid sell route:
Defining a data provider
Since we’ll be working with the Jupiter API, we need to define our Jupiter provider. This is going to be a class with methods that fetch data from the Jupiter API.
Under a new directory called providers, go ahead and create a new file called JupiterProvider.ts. Here, let’s define a JupiterProvider class with two methods, one for returning the valid routes and quote for our asset, and another one for fetching the price of an asset. These both match the types we defined above:
Building the Honeypot checker logic
We now have all the necessary parts to build out the actual logic that checks whether a token is a Honeypot or not.
Under src, create a new file called TokenChecker.ts. This is where we’ll implement the core logic for our honeypot checker, which we defined above, mainly:
- Check if the mint authority has been revoked.
- Confirm the token is governed by the SPL Token standard.
- Look for valid sell routes and compare the quoted output with the expected amount.
We’ll start with an empty function that takes in the rpcUrl as part of its constructor.
Inside the TokenChecker class, we’ll define our first method, checkMintAuthorities, which checks whether they have been revoked or whether the token issuer continues to have control over the supply.
Next, we check whether the contract is governed by the SPL Token standard. This will rule out any coins that may have malicious code, which modifies the standard functionality of the token, including locking or removing the sell function.
Let’s create a new function called checkProgramOwnership inside the TokenChecker class:
Next, we’ll create our third function called checkJupiterRoutes. This will look for valid sell routes and ensure that the quoted price matches how much we expect to receive for selling that token.
The testAmount is set to $1000 USDC, and the testSlippage is set to 10%. You can adjust these values to simulate different trade scenarios based on your own amount and risk tolerance. Keep in mind that higher slippage allows more room for poor quotes to pass the check, which could make the results less reliable.
Finally, we’re going to add one more method to our TokenChecker class, which will run through all of the above checks for us and append any results so we can display them in the console:
Running the Honeypot Checker
We now have all the necessary parts to run our honeypot checker. To do this, we’ll need to create a new instance of the TokenChecker class and pass it an input and output token.
We’ll do this inside our empty index.ts file under the /src directory:
Run the code using the following command: npx tsx src/index.ts. Your honeypot checker will start performing the various checks and will return an output that looks like this, if the token is legitimate:
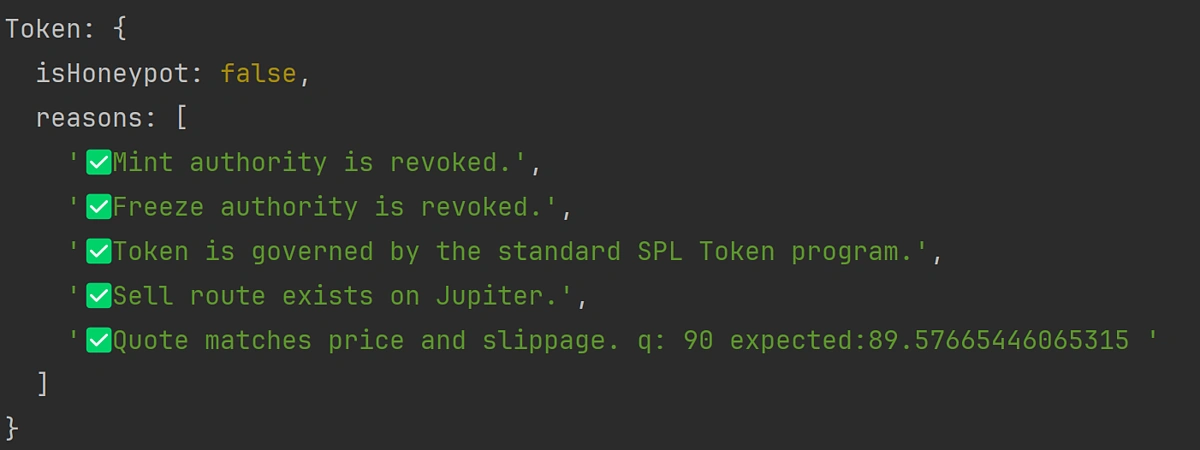
Note that established tokens like USDC or those issued by large, regulated entities may not pass the mint or freeze authority checks. This is because they are often required to retain certain permissions for compliance or operational reasons. This tool is primarily intended for evaluating new tokens or small-scale projects, where there is typically no legitimate need to retain minting or freezing privileges after launch.
Detect Honeypot Tokens Using CoinGecko API
CoinGecko API provides comprehensive on-chain data that can be helpful when assessing whether a token might be a honeypot, including key indicators like mint authority, freeze authority, and liquidity. Additional fields such as has_socials and on_coingecko offer further context to filter out high-risk or low-credibility assets, especially when scanning newly listed tokens. The API is particularly useful because it aggregates data across multiple DEXs and chains, making it easier to scan and evaluate tokens in a multi-chain environment without juggling different RPCs.
Check if a Token Is a Honeypot
One standout feature of the megafilter is a built-in honeypot filter, which allows us to exclude all honeypots from our query and only return legitimate liquidity pools and tokens. This can be done by including the no_honeypot check in the checks parameter:
This will generate an output that looks like this:
Using the Megafilter’s built-in honeypot checker streamlines the process significantly, eliminating the need to inspect contracts or analyse transaction patterns manually. Results can be easily parsed as JSON or imported into a table for more convenient browsing.
Check Liquidity
As we've determined above, simply checking whether a smart contract is a honeypot may not be enough since attackers may try to lock your funds in other ways. One common way is to limit the amount of exit liquidity available in a liquidity pool.
To account for this and exclude pools with little or no liquidity, it's possible to include the h24_volume_usd_min and reserve_in_usd_min parameters to filter out pools with low volume and low base currency reserves:
These additional filters can be added on top of the Honeypot check, making it quick and efficient to confirm the validity of a contract and token in a single API call. Additional filters, such as pool_created_hour_min and tx_count_min may also be appended to only include liquidity pools with sufficient history and number of transactions.
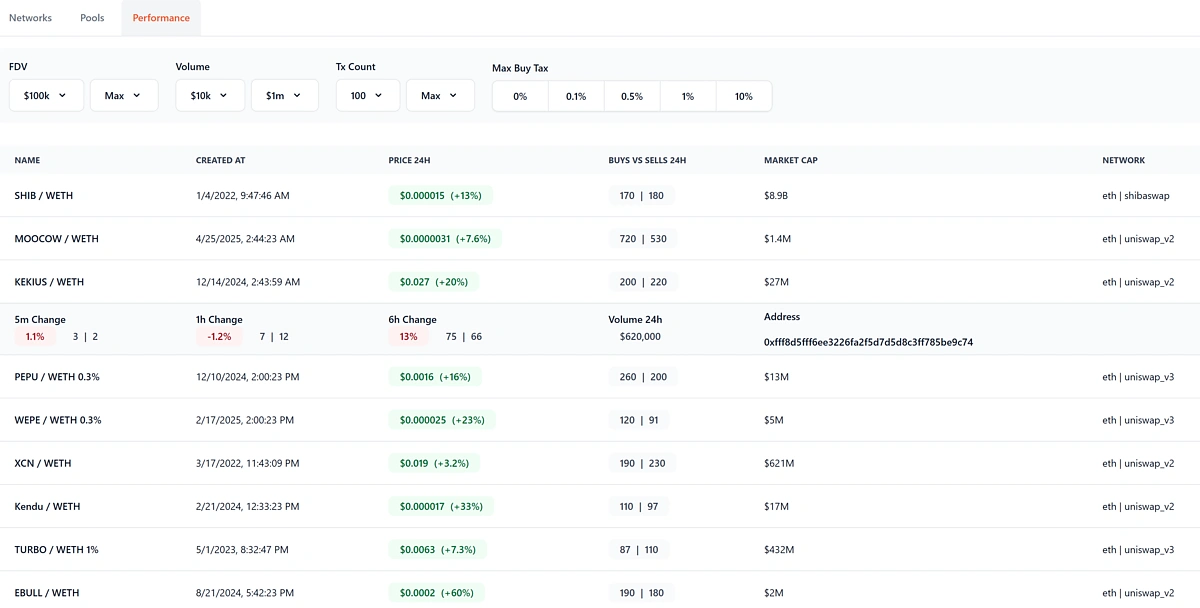
For instance, this is an open-source project that uses the CoinGecko Megafiler API to help users find new and promising liquidity pools by leveraging the various filters that we have covered above. It does all the heavy lifting under the hood and lets you get a feel for the Megafilter API and how it can be used to slice and dice liquidity pool data, with all the safety checks in mind.
Check Mint and Freeze Authority
Although the Megafilter's no_honeypot check does a lot of the heavy lifting under the hood, you might prefer to manually check the Mint and Freeze authority for a smart contract, depending on your specific use case. This can be easily done using the Token Info By Token Address endpoint, without having to manage an RPC URL endpoint:
The response will return the token's contract information, including the mint_authority and freeze_authority properties, which can be used to determine whether the deployer has relinquished control over the governing contract:

Final thoughts
Whether you're building a trading bot, portfolio tracker, or a retail-facing dApp, integrating a honeypot checker can be a vital step toward improving user safety and trust in your product. If you enjoyed this article, be sure to check out this one on How to Build an AI Agent with SendAI's Solana Agent Kit.
```


 Or check it out in the app stores

