
In today's guide, we’ll build a paper trading bot using Python, PostgreSQL, Docker, and the CoinGecko API. Docker allows us to package our application and its dependencies into a lightweight, portable container that can be deployed on almost any machine and operating system.
What is Crypto Paper Trading?
Paper trading in crypto involves simulating trades without real money, to test strategies, practice trading, and track performance in a risk-free environment. By tracking hypothetical profits and losses based on real-time market data, users can build confidence before committing to actual funds.
Paper trading bots are an extension of crypto paper trading—they automatically execute trades on your behalf, but instead of placing real orders on a live exchange, they are mocked locally. This is particularly useful when trying out a new strategy on current market conditions.
Prerequisites
Before we get started, you’ll need the following tools:
- Python 3.10+
- An IDE
- Docker
- Postgres
- WSL 2 (Windows only)
The Demo API is free to use and sufficient for our purpose. Create your CoinGecko account, head over to the Developers’ Dashboard, and click on +Add New Key to generate your Demo API Key. Follow this guide for more information on generating and setting up your key.
Step 1. Set Up Your Python Environment
Let’s start by creating a clean Python virtual environment and installing the required dependencies. In an empty directory, run the following commands:
With the environment activated, we can now install our dependencies. Because we’re operating inside a virtual environment, our requirements will only be installed locally, leaving the global Python interpreter unaffected.
At the root of your project directory, create a file called requirements.txt and paste the following requirements:
To install them, simply run pip install -r requirements.txt from your terminal or command prompt.
Step 2. Create and Import Your Configuration
Start by creating a .env file and define the following variables:
CG_API_KEY is where you’ll paste your CoinGecko API key. The DATABASE_URL variable holds the connection string for our PostgreSQL database, while the remaining variables are configuration options that our bot will use.
These can be adjusted based on your requirements. One thing to note here is the PRICE_CHANGE variable. This represents the minimum percentage price change a coin must reach within 1 hour for our paper trading bot to place a Buy order. This is the core of our logic.
Now to import these settings into our application, go ahead and create a new directory called utils, and inside this directory, create a new file called load_env.py.
To keep things organized, we’re going to load our configuration variables in this file, and then import this file every time we need access to them:
Step 3. Create Project Structure
Before building our bot, here’s a quick overview of the project structure:

Feel free to create these now, as this project structure will serve as the foundation for building our paper trading bot.
Step 4. Create Models
A model represents the structure of your application's data – it defines the attributes (fields) and relationships for an entity, such as a user, trade, or portfolio item, and acts as a blueprint for the corresponding database table.
To connect to our database, we’re using SQLAlchemy—a powerful and flexible Object-Relational Mapping (ORM) library. SQLAlchemy serves as a bridge between Python code and the database, enabling us to work with database records as Python objects.
Instead of writing raw SQL queries, we can use Python’s built-in typing system to define these models and to interact with the database in a cleaner and more maintainable way.
A paper trading bot is all about testing and measuring different strategies and variations. A well-structured database is essential for this purpose, as it allows us to efficiently store and query large amounts of data related to trades, market conditions, and strategy performance.
Under data_access/models, let’s go ahead and create a file called base.py. This is so we can define a common Base object for our database models that we can use for the various tables we need to build.
Create Coin Data Model
We can now start defining our models. In the same directory, go ahead and create a new file called coin.py. This is where we’ll be defining our Coin model:
Here we're defining two separate models—one for a table called coins and another for a table called coins_prices. In addition to storing the current price of a coin, we also want to start collecting historical data. To achieve this, we'll create a dedicated table for coin price entries.
The coins table stores the database ID, as well as the coin_id, which is the unique identifier used by the CoinGecko API. This coin_id is essential when fetching data for a specific coin. Alongside the coin_id, we also store the coin’s symbol and a realized_pnl value, which will track the overall profit or loss our bot has made for that particular coin.
Create Order Model
Inside the same directory, go ahead and create a file called paper_order.py where we’re going to define our Order object.
Since we’re building a paper trading bot, we will create a mock order object using the common fields that we might expect from an exchange order, such as the buy_price, quantity, symbol, and direction of our trade.
Create Portfolio Model
The final model we’re creating defines our Portfolio object and its relevant fields. In the same data_access/models directory, create a new file called portfolio_item.py.
Inside this file, we'll define two objects: a PnLEntry and a PortfolioItem.
We’ll use the PnLEntry to capture regular snapshots of our portfolio’s performance, linking each snapshot to a specific portfolio item. For example, your total Bitcoin holdings—accumulated from all Bitcoin trades—will be grouped under your Bitcoin portfolio item. The algorithm will take an hourly reading of your PnL and update the PnL entry accordingly.
This allows us to easily track performance over time and glean valuable insights into how the bot performs under different market conditions.
Step 5. Create Docker Environment
Now that we’ve defined our models, it’s time to set up our Docker environment.
This step involves two main components: creating a Dockerfile and a docker-compose.yml file – let’s go over this in a bit more detail.
Creating a Dockerfile
The Dockerfile defines the instructions for building a Docker image. It specifies the base image, installs dependencies, copies your application code, and sets up the environment. It serves as a blueprint for creating a containerized version of your application.
Below is the Dockerfile we'll be using, with comments included for each line to explain what's happening:
Creating a docker-compose.yml
The docker-compose.yml file defines and manages multi-container Docker applications. It specifies how to configure and run multiple containers—for our app and database specifically—and their interactions. This file makes it easy to spin up all necessary services with a single command, simplifying the setup of your development or production environment.
This is telling docker to create two containers – app and db and a db_data volume where the contents of the database will be stored.
Testing Our Docker Build
To confirm that everything works as expected, let's create a main.py file in the root directory with the following code.
This should print 'Hello world' to the console inside the docker container and mount our database tables.
Configure PGAdmin (Optional)
PGAdmin is an excellent tool for exploring a database without the need to write any code. To get started, simply download PGAdmin to your machine, then register a new server by entering the following details:
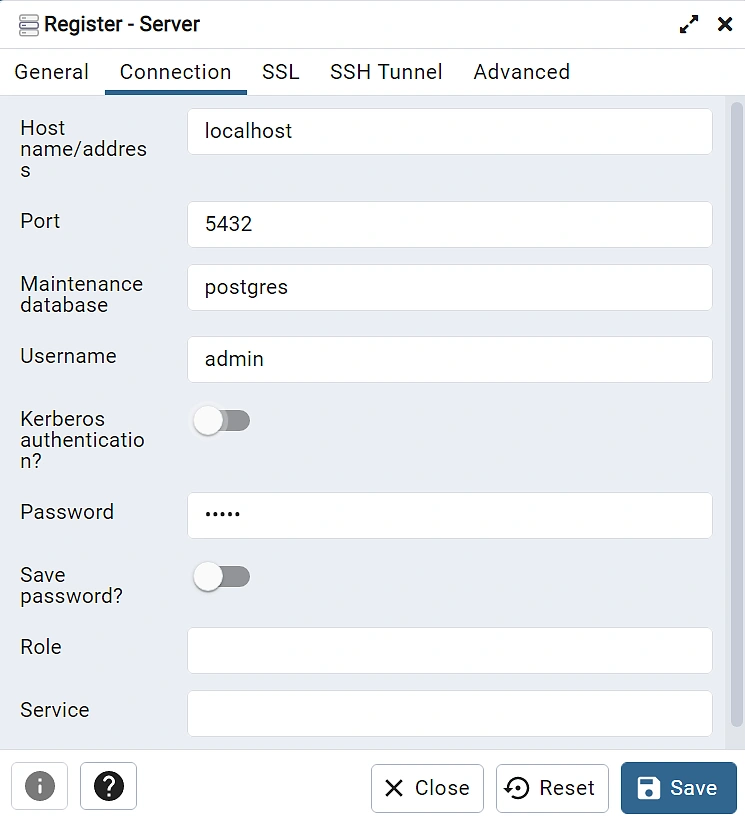
The password is also admin. These are also defined within the docker-compose.yml under the db container.
Now, if you expand the server, navigate to the Data database, and expand the Tables object, you’ll see that our app’s tables have been successfully mounted.

You can query the data directly using SQL, or right-click on a table and select View All Rows to see all the available rows.
Step 6. Create Services
Now let's create the service classes that our trading bot will use to perform various tasks. Let’s begin with the CoinGecko service—a class containing several methods to fetch data from the CoinGecko API.
Building the CoinGecko (API) Service
Inside the services directory, create a new file called coingecko_service.py. In this file, we’ll define a CoinGecko class with two variables in its constructor: self.headers and self.root. This approach ensures we keep our code DRY (Don't Repeat Yourself), avoiding unnecessary repetition of the endpoint's root URL.
The CoinGecko class needs to perform the following actions:
- Fetch the price of a specific coin using the coin_id.
- Retrieve available base coin pairs (also known as /simple/supported_vs_currencies in the CoinGecko API).
- Get a list of coin data.
Our implementation should look like this:
The get_coin_list() function is the main method we'll use to update coin data. This function will call the /coins/markets endpoint to retrieve data for the top 250 coins by market cap. Additionally, we want to include the price change percentage for each asset over the last hour.
To achieve this, we pass the following arguments to the endpoint:
f"/coins/markets?order=market_cap_desc&per_page=250&vs_currency={Currency.USD}&price_change_percentage=1h"
When the price_change_percentage parameter is included, each Coin object will contain an additional property where this value is stored. In our case, that property is called price_change_percentage_1h_in_currency because we’re asking for the price change against a vs_currency (usd).
To fetch all the vs_currencies, you can use the get_vs_currencies() method and store its output somewhere for easy access. In this application, we’re storing the output in an Enum, located in the enums directory inside a file called currencies.py.

Building the Trading Service
The trading service handles the execution of mock buy and sell operations for our paper trading bot. These methods return a PaperOrder object, containing the key information we'd typically expect from an exchange order.
Additionally, we define a calculate_cost_basis() function needed for calculating the cumulative cost for a specific coin, helping us track the total quantity and average value of our holdings for a specific asset.
To get started, create a new file called trading_service.py under services. Now let's go ahead and build our buy(), sell() and calculate_cost_basis() methods:
Note the @staticmethod decorator, which allows us to call a class method without initializing the class itself.
Step 7. Putting the Logic Together
With all the necessary components in place, we're ready to build the core logic and define the entry point of our Python application. Start by creating a file named main.py in the root directory and importing the required dependencies, including external libraries and the files we've created in our project.
Next, let's create a database engine and initialize the session.
Note the line 'Base.metadata.create_all(engine)'– this line initializes our database tables as we've defined them under the models directory.
We've also disabled logs of lower severity than critical because sqlalchemy is quite verbose so our logs tend to get lost in the noise! Feel free to remove the logging.disable() if you wish to see the database execution logs.
Now, let's instantiate our services:
Next, we’ll define a function to handle database initialization. While we've already created our database tables in the previous steps, they currently lack data for our bot to operate on. To address this, we’ll populate the tables by fetching coin data using the CoinGecko.get_coin_list() class method.
Now that we have an initial set of coins and prices in our database, we need a method to update our coin prices periodically by adding new entries to the coin_prices table:
Next, we need to write a function that handles our buy logic and saves buy orders to the database:
Finally, the last piece of the logic is a method that handles the sell logic:
The two important lines here are if current_price <= stop_loss_price: and elif current_price >= take_profit_price: which basically says that we want to close our position if either the stop loss or the take profit has been reached.
Now that we’ve built out all the methods that define the logic of our trading bot, we need to run those in a loop, so that our bot can run continuously.
Since we’re asking for a 1-hour price change for the CoinGecko API, it makes sense for our trading bot to run every hour, performing the following tasks:
The main() function brings together all of our logic in the following flow:
- We populate the database with initial data and pull the top 250 coins from CoinGecko
- We then handle buy and sell scenarios for each coin and add a new price entry.
- Finally, our algorithm sleeps for 1 hour before repeating the cycle.
To start your bot, simply run: docker compose -p "paper_bot" up -d --build from the root directory.
To view your application logs, run docker logs app from the command line. You may also use Docker Desktop and click through to the app container, and you should see the following log:
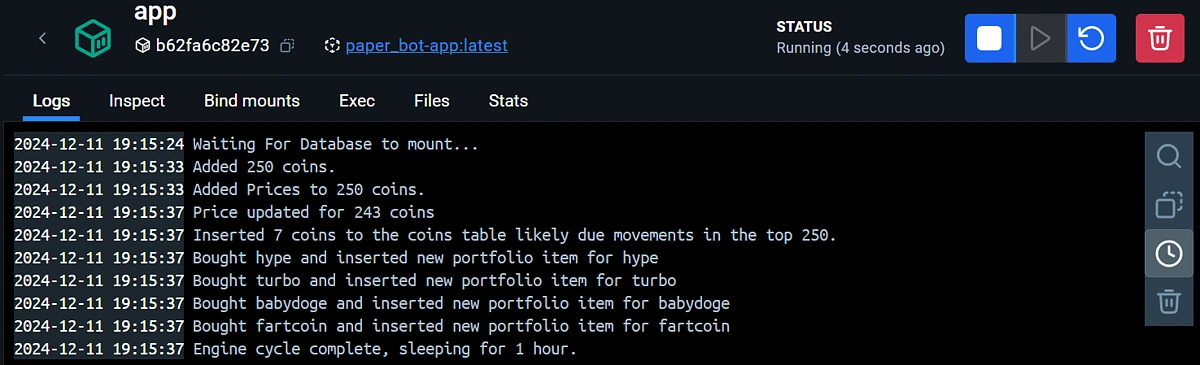
For a view of the Database, you can use the PGAdmin app if you’ve installed it and query it from there. Alternatively, install the psql CLI and use the following command to connect to your database:
psql -h localhost -p 5432 -U admin -d data
Congratulations! You now have a fully Dockerized paper trading bot that scans the top 250 coins by market cap to identify volatile assets.
Conclusion & Considerations
This bot is designed for paper trading, meaning there’s no real financial risk involved. However, since it places mock trades, it doesn’t compete in a live order book. This means results may differ from live trading due to factors like slippage or partial fills.
To place live trades, the bot would need to connect to an exchange. If you decide to do so, ensure you trade responsibly and consider implementing additional error handling to account for the complexities of live market conditions.
For a quick start, you may clone this repository and build the application using Docker.
If you enjoyed this guide, be sure to check out this tutorial on how to build a candlestick chart application using Python!
```


 Or check it out in the app stores
 Arbitrum
 Avalanche
 Fantom
 Flare
Flare
 Gnosis
 Linea
Linea
 Optimism
 Polygon
 Polygon zkEVM
 Scroll
 Stellar
 Story
Story
 Syscoin
 Telos
Telos
 Xai
Xai


