
As a developer, you've likely considered ways to accelerate the coding process by leveraging artificial intelligence (AI). One such tool that has gained significant attention is Cursor AI, an AI-powered code editor that can interpret, predict, and generate code without ever leaving the code editor environment.
In this comprehensive guide, we'll walk through how to use Cursor AI to build a web application, specifically a cryptocurrency price converter. We'll additionally leverage CoinGecko API to fetch crypto price data.

What is Cursor AI?
Cursor AI is an innovative AI code editor that can interpret, predict, and generate code. It provides a familiar interface similar to Visual Studio Code and allows users to import all extensions, themes, and key bindings from their current editor with a single click. One of Cursor's standout features is its privacy mode, which promises to maintain the confidentiality of your codebase by not storing any code.
Prerequisites: Cursor AI Code Editor Tutorial
To follow this guide, you’ll need the following in place:
-
Basic knowledge of JavaScript and React – Familiarity with JavaScript ES6+ features and basic React concepts such as components, hooks (useState, useEffect), and state management.
-
Familiarity with web scraping concepts
-
A text editor or Integrated Development Environment (IDE):
You will need a code editor to write your application. Popular choices include Visual Studio Code, Sublime Text, and Atom. We will be using Visual Studio Code. -
Node.js and npm as our development environment: Ensure that Node.js and npm are installed on your machine. Node.js is a JavaScript runtime built on Chrome's V8 JavaScript engine, and npm is the package manager for Node.js, which you'll use to manage your project's dependencies.
-
CoinGecko API for crypto price and market data: The free Demo plan is sufficient for our needs, with a rate limit of 30 calls per minute and a monthly cap of 10,000 calls. Check out our API documentation or learn how to get your Demo API key.
Step 1: Setting Up Cursor AI
First, visit www.cursor.com and download the latest version of the Cursor AI desktop application. We’ll open the app after installation.
Next, open a folder in Cursor AI where you want the source code to be saved.
Open the Terminal in the cursor AI app and set a basic React app using create-react-app.
npx create-react-app YOUR-APP-NAME
This command will create a React boilerplate project in your designated folder.
Step 2: Using Cursor AI to Build the App
Now that we have our development environment set up, let's start using Cursor AI to build our crypto price converter web app:
-
Open the App.js file in the Cursor AI editor.
-
Select the existing UI code in App.js.
-
Press
CTRL + Kto edit the selected code. -
In the Cursor AI code editor, provide instructions for how you want the code to be modified. For our crypto price converter, you might use a prompt like: “Create a React component for a cryptocurrency price converter. Include input fields for the amount, 'from' currency, and 'to' currency. Add a button to trigger the conversion and display the result.”
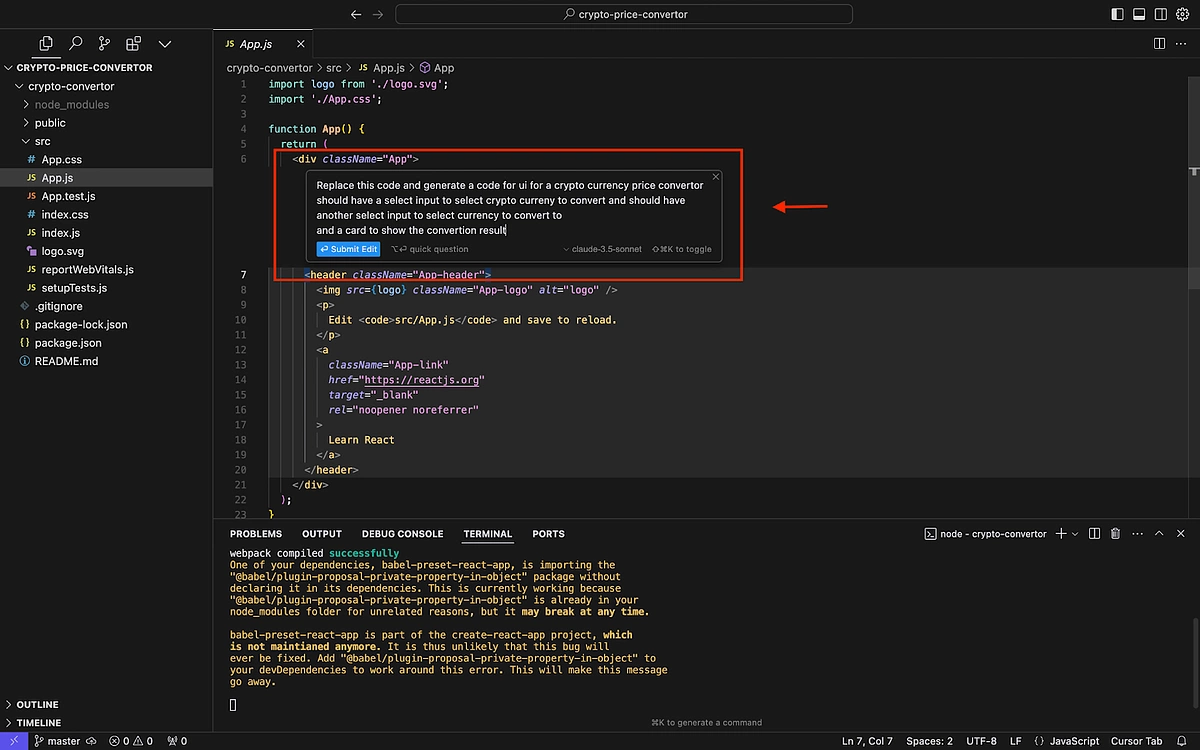
-
Cursor AI will generate code based on your instructions. Review the generated code and decide whether to accept or reject it.
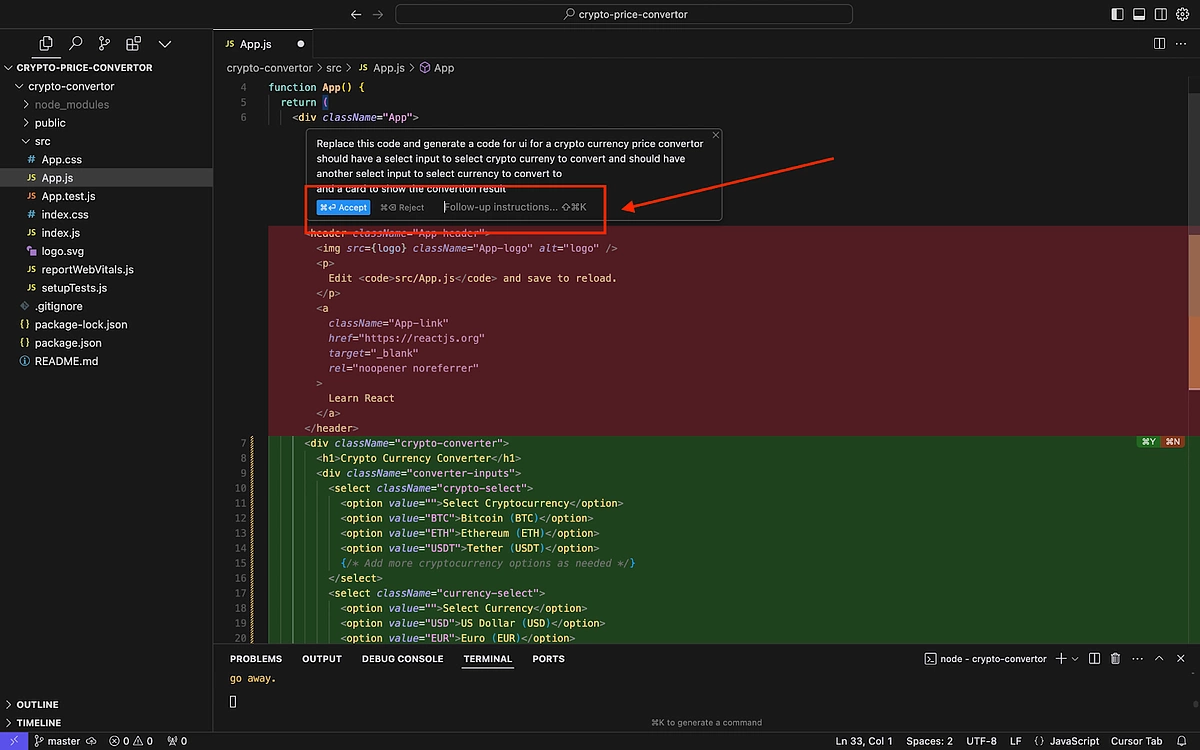
-
If needed, provide follow-up instructions to refine the generated code further.
Step 3: Enhancing Styling and Functionality
After accepting the initial code changes from Cursor AI, we'll iterate on our application's styling and functionality:
-
Use the same method as before to instruct Cursor AI to improve the styling of your component. For example: "Add CSS styles to make the converter visually appealing. Use a modern color scheme and ensure the layout is responsive."
-
To add functionality for handling currency changes, provide instructions like: "Implement functions to handle changes in the input fields. Update the state when the user selects different currencies or enters an amount."
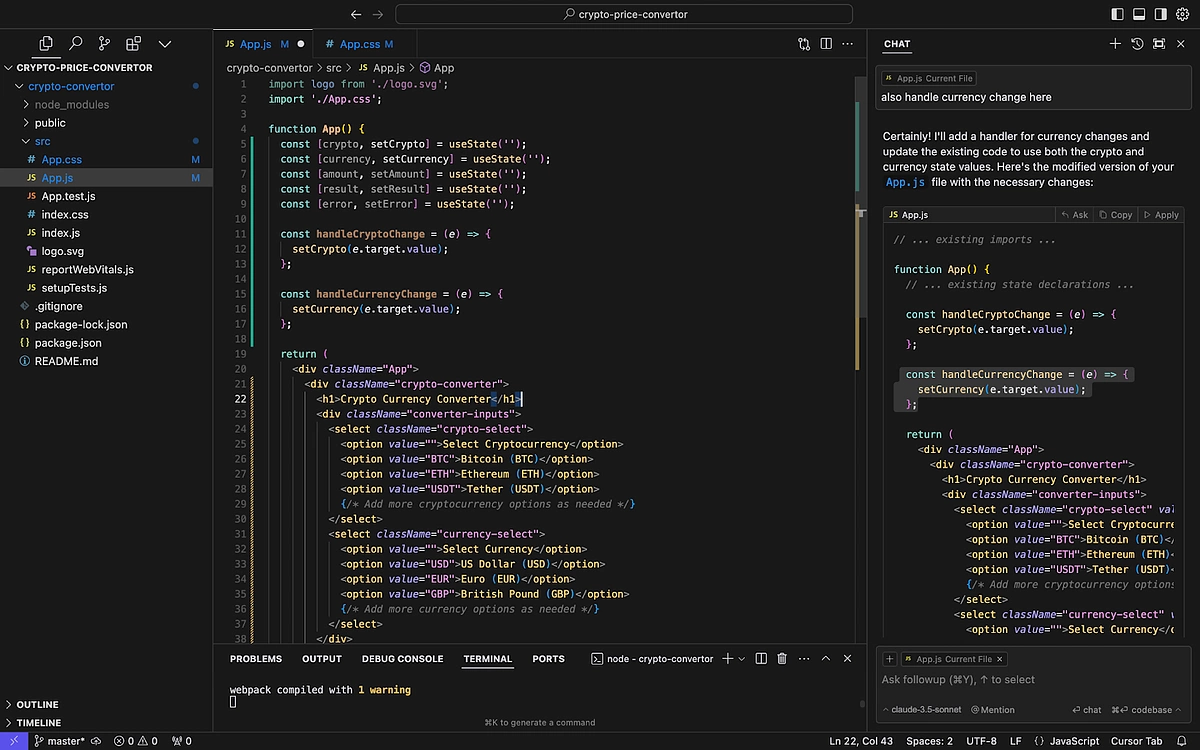
-
Cursor AI will provide inline suggestions as you edit the code. You can incorporate these suggestions by pressing the 'Tab' key.
-
To interact with the CoinGecko API, instruct Cursor AI to add the necessary API calls: "Add a function to fetch real-time exchange rates from the CoinGecko API when the user clicks the convert button."
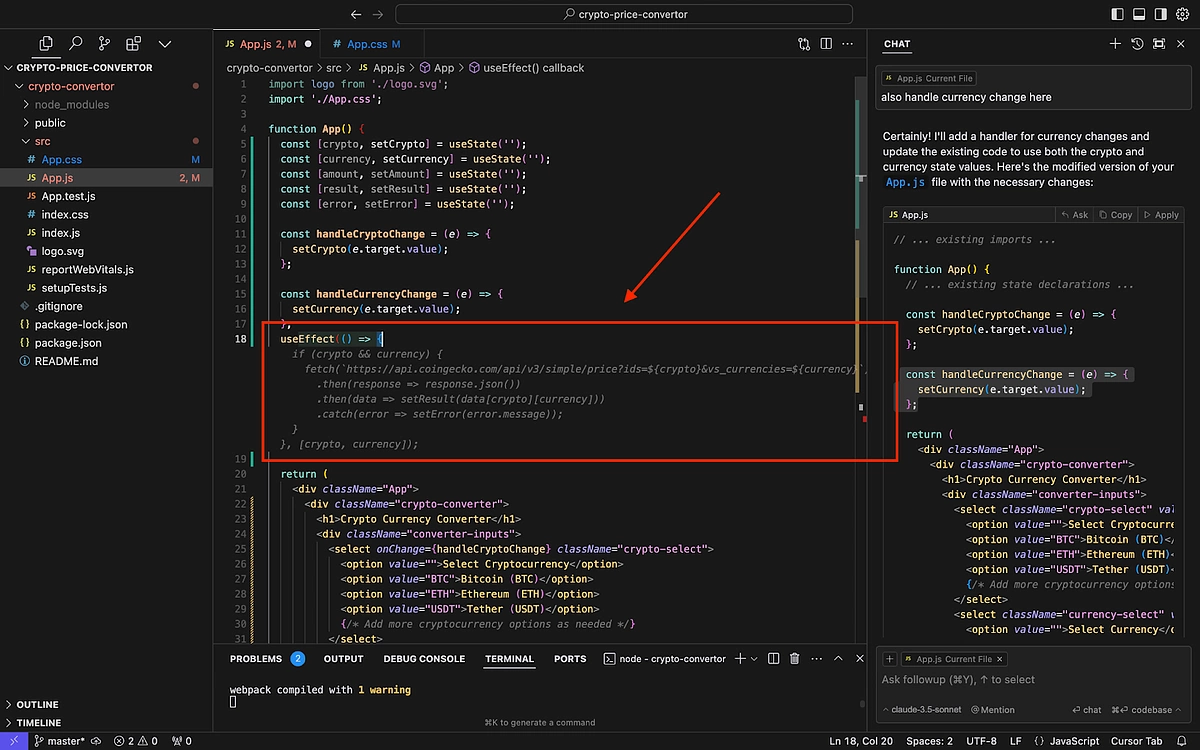
-
Continue this iterative process, providing instructions and refining the code until you're satisfied with the result.
Step 4: Testing and Debugging
Once you've implemented the core functionality of your crypto price converter, it's time to test and debug:
-
Save your changes and run the development server by entering the following command in the terminal:
npm run start
-
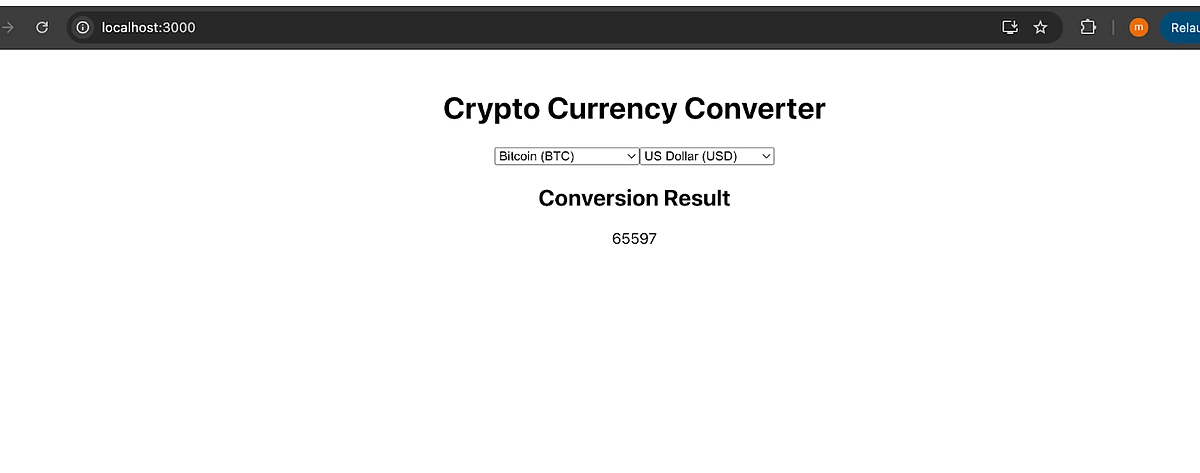
Open your browser and navigate to http://localhost:3000 to see your application in action.
-
Test various scenarios, such as converting different cryptocurrencies and entering various amounts.
-
If you encounter any issues, use Cursor AI's chat feature (accessible by pressing
CTRL + L) to ask for help. For example: "The conversion result isn't displaying correctly. Can you help me debug this issue?" -
Implement any necessary fixes or improvements suggested by Cursor AI.

Essential Keyboard Shortcuts for Cursor AI
Keyboard shortcuts are essential for maximizing productivity in any development environment, and Cursor AI is no exception. By mastering these shortcuts, you can significantly speed up your workflow and make the most of Cursor AI's powerful features.
Essential Cursor AI Shortcuts
- Composer Shortcuts
-
Open Composer in a floating window:
CMD + I(MacOS) orCTRL + I(Windows) -
Open full-screen Composer:
CMD + SHIFT + I(MacOS) orCTRL + SHIFT + I(Windows) -
Mention files in Composer: Type
@filename -
Add files to Composer: Type
#filename -
Select multiple files:
CMD + P(MacOS) orCTRL + P(Windows)
-
Open Composer in a floating window:
- AI Pane Shortcuts
-
Open AI Pane:
CMD + L(MacOS) orCTRL + L(Windows) -
Open AI Pane with selected text:
CMD + SHIFT + L(MacOS) orCTRL + SHIFT + L(Windows) -
Mention a file in AI Pane: Type
@filename -
Attach entire codebase to message:
CMD + Enter(MacOS) orCTRL + Enter(Windows)
-
Open AI Pane:
- Inline Editing
-
Edit selected code with AI: CMD + K (MacOS) or
CTRL + K(Windows) -
Close inline editing mode:
ESC
-
Edit selected code with AI: CMD + K (MacOS) or
- Settings
-
Open Cursor Settings:
CMD + SHIFT + J(MacOS) orCTRL + SHIFT + J(Windows)
-
Open Cursor Settings:
- Terminal Commands
-
Use AI in terminal:
CTRL + K
-
Use AI in terminal:
Advanced Shortcuts and Techniques
- Context Symbols: Use @ to reference files, folders, code sections, or documentation. This is particularly useful for referencing entire files
- Navigating Suggestions: Use the up/down arrow keys to navigate through suggestion lists, and press 'Enter' to select a suggestion.
-
To toggle between files, press
CTRL +Mor CMD +M. - Use the "Quick Question" feature (accessible via context menu or custom shortcut) to ask quick questions about the selected code snippet.
Customizing Shortcuts
To avoid conflicts with existing VS Code shortcuts, you can additionally customize Cursor AI's keyboard bindings:
- Open Cursor Settings:
CMD + SHIFT + J(MacOS) orCTRL + SHIFT + J(Windows) - Navigate to General > Editor > Configure keyboard shortcuts.
- Modify the shortcuts to suit your preferences.
For example, you could remap the AI features to use CMD + U instead of CMD + K:
[{"key": "shift+cmd+u","command": "aipopup.action.modal.generate","when": "editorFocus","args": { "invocationType": "toggle" }},{"key": "cmd+u","command": "aipopup.action.modal.generate","when": "editorFocus","args": { "invocationType": "new" }},{"key": "cmd+u","command": "cursorai.action.generateInTerminal","when": "terminalFocus && terminalHasBeenCreated || terminalFocus && terminalProcessSupported"}]
Another example of how you could remap Cursor AI shortcuts, this time focusing on remapping the AI Pane shortcuts to use CMD + P instead of CMD + L:
[{"key": "shift+cmd+u","command": "aipopup.action.modal.generate","when": "editorFocus","args": { "invocationType": "toggle" }},{"key": "cmd+u","command": "aipopup.action.modal.generate","when": "editorFocus","args": { "invocationType": "new" }},{"key": "cmd+u","command": "cursorai.action.generateInTerminal","when": "terminalFocus && terminalHasBeenCreated || terminalFocus && terminalProcessSupported"},{"key": "cmd+p","command": "cursorai.action.openAIPane","when": "editorTextFocus"},{"key": "shift+cmd+p","command": "cursorai.action.openAIPaneWithSelection","when": "editorHasSelection"},{"key": "alt+cmd+p","command": "cursorai.action.toggleAIPane","when": "editorTextFocus"}]
In this configuration:
-
We've retained the remapping of
CMD + KtoCMD + Ufrom the previous example. -
We've added new mappings for the AI Pane:
-
CMD + Pnow opens the AI Pane (replacing CMD + L) -
SHIFT + CMD + Popens the AI Pane with the selected text (replacing SHIFT + CMD + L) -
ALT + CMD + Ptoggles the AI Pane visibility
-
This configuration allows you to use CMD + P for AI Pane operations, which might be more intuitive if you're used to using CMD + P for quick actions in other editors. However, be aware that this might conflict with the default "Quick Open" functionality in VS Code, so you may need to remap that as well if you use it frequently.
Remember, these are just examples. The best configuration is the one that feels most natural to you and complements your existing workflow. Feel free to experiment with different combinations until you find the setup that maximizes your productivity with Cursor AI.
Conclusion
In this guide, we've demonstrated how to use Cursor AI to quickly and efficiently build a cryptocurrency price converter web app with minimal manual coding. By harnessing Cursor AI's features like code generation, inline suggestions, and its chat interface for debugging, developers can streamline their workflow and significantly enhance productivity.
While Cursor AI simplifies many aspects of coding, it's important to remember that it complements rather than replaces human expertise. Developers still need to make critical decisions about code structure, architecture, and problem-solving, ensuring that AI-generated code aligns with project goals.
As AI tools like Cursor continue to evolve, they hold immense potential to revolutionize software development by automating routine tasks and offering intelligent assistance. Mastering these tools empowers developers to take on more complex projects, innovate, and push the boundaries of web application development.
Enjoyed this article? Check out other React guides – like this one on building an interactive crypto price tracker.


 Or check it out in the app stores

