





 Make us preferred on Google
In the dynamic world of cryptocurrencies, the ability to interact with blockchain networks is of utmost importance. One of the key components facilitating this interaction is the crypto wallet.
In this tutorial, I will be demonstrating how to build a basic crypto wallet with Python, designed to provide a simple and user-friendly interface for interacting with the Ethereum network. We’ll be using the Ethereum network for this demo due to its popularity and wide usage in the crypto space. Our wallet will be ERC-20 token-compatible, a standard for most projects built on Ethereum. To keep testing free and safe, the wallet connects to Sepolia, Ethereum’s test network, by default.
Let’s first review the key functionalities of our crypto wallet.
Level of Functionality
We’ll kickstart the process by determining our crypto wallet’s key functionalities:
- Generating and Storing Keys: The wallet can generate a new pair of public and private keys. The public key, also known as the wallet address, is used to receive funds, while the private key is used to sign transactions.
- Displaying Balance: The wallet can display the user’s balance in Ether, or in any ERC-20 token based on the token’s contract address.
- Sending and Receiving Transactions: The wallet can send Ether to other Ethereum addresses, and anyone can send funds to its address. Transaction details are signed with the user’s private key and sent via the Infura API. The transaction hash, used to track the transaction, is returned. Test Ether (for test networks) or real Ether (for the Ethereum mainnet) is needed to fully test this functionality.
- Viewing Market Chart: The application can fetch and display the market chart data for a specific contract in USD. It uses CoinGecko API to get the market chart data.
Disclaimer: This is a basic wallet and does not have advanced features such as staking, swapping, or interacting with decentralized applications (dApps). It is a learning project and should not be used to hold real funds.
The wallet will use web3.py, a Python library that allows interaction with the Ethereum blockchain through JSON-RPC, and the Infura API, a service that provides access to Ethereum nodes, to connect to the network and perform transactions.
The front-end of the wallet will run on a web browser and will use HTML, CSS, and JavaScript to create the interface and functionality. The front-end will communicate with the back-end, which will be written in Python, using Flask, a web framework that allows building web applications.
Prerequisites and Installing the Required Python Libraries
Before building, there are a few prerequisites that you need to have:
- Python: Python 3.9 or higher should be installed on your system, as we will be using Python to write our back-end code. You can download it from the official Python website.
- Flask: Flask is a lightweight web framework for Python, and will be used to create our web application. You can install Flask using pip, which is a package manager for Python.
- Web3.py: Web3.py is a Python library for interacting with Ethereum. It’s a crucial part of our project as it allows us to generate accounts and interact with the Ethereum blockchain. This guide uses web3.py version 7. You can install web3.py using pip.
- Infura Account: Infura is a service that provides access to the Ethereum network. You will need to create an Infura account to get your Infura API key.
- Sepolia Test ETH: To test sending transactions without spending real funds, get free Sepolia ETH from a faucet, such as the Google Cloud Sepolia faucet.
- CoinGecko API: We will be using the CoinGecko API to fetch the market chart data for cryptocurrencies. The CoinGecko API has a free Demo plan accessible to all users with a 100 calls/min rate limit and a monthly cap of 10,000 calls. Sign up for a CoinGecko account and apply for the Demo plan to generate your complimentary API key.
- Text Editor or IDE: You will need a text editor or an Integrated Development Environment (IDE) to write your code. Some popular choices include Visual Studio Code, PyCharm, and Sublime Text.
While not mandatory, having a basic understanding of how cryptocurrencies and the Ethereum blockchain work will help understand the code and the workings of the crypto wallet.
Before running the code, you also need to install the necessary Python libraries. Create a project folder and add a requirements.txt file with the following contents:
1
2
3
4
flask>=3.0
web3>=7.0
requests>=2.31
python-dotenv>=1.0
Then open your terminal or command prompt in the project folder and run:
pip install -r requirements.txt💡Pro-tip: On macOS and Linux, you might need to use python3 and pip3 instead of python and pip. Installing the libraries inside a virtual environment (python3 -m venv .venv) keeps them separate from your other projects.
Next, store your keys in a .env file in the same folder, instead of hardcoding them in your code. The app reads them with python-dotenv. The repository includes this template as env.example:
1
2
3
4
5
6
7
8
9
10
11
12
13
# Copy this file to .env and fill in your keys: cp env.example .env

# Flask session signing key: any long random string
FLASK_SECRET_KEY=replace-with-a-long-random-string

# Infura API key (https://www.infura.io/). Used to connect to Ethereum Sepolia.
INFURA_API_KEY=your_infura_api_key

# Optional: any Ethereum JSON-RPC URL. Overrides INFURA_API_KEY when set.
# ETH_RPC_URL=https://sepolia.infura.io/v3/your_infura_api_key

# CoinGecko Demo API key (https://www.coingecko.com/en/api/pricing)
COINGECKO_DEMO_API_KEY=your_coingecko_demo_api_key
💡Pro-tip: Never commit your .env file to GitHub or share it. It contains your API keys.
How to Build a Crypto Wallet on Ethereum
Developers can build a crypto wallet on Ethereum by using Python for both the back-end (integration with web3 libraries for blockchain interaction) and front-end (Flask, for the user interface). Here is an illustrative example of the implementation:
1
2
3
4
5
6
7
8
9
10
11
12
13
14
15
16
17
18
19
20
21
22
23
24
25
26
27
28
29
30
31
32
33
34
35
36
37
38
39
40
41
42
43
44
45
46
47
48
49
50
51
52
53
54
55
56
57
58
59
60
61
62
63
64
65
66
67
68
69
70
71
72
73
74
75
76
77
78
79
80
81
82
83
84
85
86
87
88
89
90
91
92
93
94
95
96
97
98
99
100
101
102
103
104
105
106
107
108
109
110
111
112
113
114
115
116
117
118
119
120
121
122
123
124
125
126
127
128
129
130
131
132
133
134
import json
import os
from decimal import Decimal, InvalidOperation

import requests
from dotenv import load_dotenv
from eth_account import Account
from flask import Flask, jsonify, render_template, request, session
from web3 import Web3
from web3.exceptions import BadFunctionCallOutput, ContractLogicError, Web3RPCError

load_dotenv()

app = Flask(__name__)
app.config["SECRET_KEY"] = os.environ["FLASK_SECRET_KEY"]

# Sepolia testnet by default, so you can test with free test ETH.
# Set ETH_RPC_URL to use another network or RPC provider.
rpc_url = os.environ.get("ETH_RPC_URL") or f"https://sepolia.infura.io/v3/{os.environ['INFURA_API_KEY']}"
web3 = Web3(Web3.HTTPProvider(rpc_url))

COINGECKO_API_KEY = os.environ["COINGECKO_DEMO_API_KEY"]
COINGECKO_BASE_URL = "https://api.coingecko.com/api/v3"

with open("erc20_abi.json") as f:
    erc20_abi = json.load(f)

# Private keys stay in server memory, never in the session cookie.
# Flask's default session is signed but not encrypted, so the browser can read it.
private_keys = {}


@app.route("/new_account", methods=["GET"])
def new_account():
    account = Account.create()
    private_key = Web3.to_hex(account.key)
    private_keys[account.address] = private_key
    session["address"] = account.address
    # The private key is returned once so you can back it up. Never share it.
    return jsonify({"address": account.address, "privateKey": private_key})


@app.route("/balance", methods=["GET"])
@app.route("/balance/<contract_address>", methods=["GET"])
def get_balance(contract_address=None):
    address = session.get("address")
    if not address:
        return jsonify({"error": "Create an account first."}), 400

    # No contract address: return the account's ETH balance
    if not contract_address:
        balance_wei = web3.eth.get_balance(address)
        return jsonify({"symbol": "ETH", "balance": str(Web3.from_wei(balance_wei, "ether"))})

    if not Web3.is_address(contract_address):
        return jsonify({"error": "Invalid contract address."}), 400

    contract = web3.eth.contract(address=Web3.to_checksum_address(contract_address), abi=erc20_abi)
    try:
        raw_balance = contract.functions.balanceOf(address).call()
        decimals = contract.functions.decimals().call()
        symbol = contract.functions.symbol().call()
    except (BadFunctionCallOutput, ContractLogicError):
        return jsonify({"error": "No ERC-20 token found at this address on the connected network."}), 400

    balance = Decimal(raw_balance) / (Decimal(10) ** decimals)
    return jsonify({"symbol": symbol, "balance": str(balance), "raw_balance": str(raw_balance)})


@app.route("/send_transaction", methods=["POST"])
def send_transaction():
    address = session.get("address")
    if address not in private_keys:
        return jsonify({"error": "Create an account first."}), 400

    data = request.get_json()
    to_address = data.get("to", "")
    if not Web3.is_address(to_address):
        return jsonify({"error": "Invalid recipient address."}), 400
    try:
        value = Web3.to_wei(Decimal(str(data.get("amount"))), "ether")
    except (InvalidOperation, ValueError):
        return jsonify({"error": "Invalid amount."}), 400

    try:
        txn = {
            "from": address,
            "to": Web3.to_checksum_address(to_address),
            "value": value,
            "nonce": web3.eth.get_transaction_count(address, "pending"),
            "chainId": web3.eth.chain_id,
        }
        # EIP-1559 fees: a tip for the validator plus room for the base fee to rise
        priority_fee = web3.eth.max_priority_fee
        base_fee = web3.eth.get_block("latest")["baseFeePerGas"]
        txn["maxPriorityFeePerGas"] = priority_fee
        txn["maxFeePerGas"] = 2 * base_fee + priority_fee
        txn["gas"] = web3.eth.estimate_gas(txn)

        signed_txn = Account.sign_transaction(txn, private_keys[address])
        txn_hash = web3.eth.send_raw_transaction(signed_txn.raw_transaction)
    except (Web3RPCError, ValueError) as e:
        # For example, insufficient funds for gas and value
        return jsonify({"error": str(e)}), 400

    return jsonify({"transaction_hash": Web3.to_hex(txn_hash)})


@app.route("/market_chart/<contract_address>/<days>", methods=["GET"])
def get_market_chart(contract_address, days):
    response = requests.get(
        f"{COINGECKO_BASE_URL}/coins/ethereum/contract/{contract_address}/market_chart",
        params={"vs_currency": "usd", "days": days},
        headers={"x-cg-demo-api-key": COINGECKO_API_KEY},
        timeout=10,
    )
    # Or use the official CoinGecko Python SDK (pip install coingecko-sdk):
    # from coingecko_sdk import Coingecko
    # client = Coingecko(demo_api_key=COINGECKO_API_KEY, environment="demo")
    # market_chart = client.coins.contract.market_chart.get(
    #     contract_address, id="ethereum", vs_currency="usd", days=days
    # ).to_dict()
    if response.status_code != 200:
        return jsonify({"error": response.json()}), response.status_code
    return jsonify(response.json())


@app.route("/")
def home():
    return render_template("index.html")


if __name__ == "__main__":
    app.run(debug=True, port=int(os.environ.get("PORT", 5000)))
This Flask application has four routes:
-
/new_account: Generates a new Ethereum account and returns the address and private key. The private key is kept in server memory, not in the browser session cookie, because Flask’s default session is signed but not encrypted. -
/balance/<contract_address>: Fetches the balance of the newly created account for the ERC-20 token atcontract_addressusing the Web3 package, adjusted for the token’s decimals. Without a contract address (/balance), it returns the account’s ETH balance. -
/send_transaction: This endpoint allows the wallet to send Ether to other Ethereum addresses. It takes the recipient’s address and the amount to be sent as input, builds an EIP-1559 transaction with current network fees, signs it with the user’s private key and sends it via the Infura API. The transaction hash is returned, which can be used to track the transaction on the Ethereum network. -
/market_chart/<contract_address>/<days>: Fetches the market chart data for the given contract address over the specified number of days using the CoinGecko API’s Coin Historical Chart Data by Token Address endpoint and returns it. Thecontract_addressis the address of the ERC-20 contract on Ethereum mainnet anddaysis the number of past days to fetch the market chart data. The Demo API key is sent in thex-cg-demo-api-keyheader.
💡Pro-tip: In Ethereum, addresses returned by this package are checksum addresses, which contain a mix of uppercase and lowercase letters. The checksum validates the address, and web3.py rejects mixed-case addresses with an incorrect checksum. The app converts every address you enter with Web3.to_checksum_address(), so you can paste addresses in any case.
You can run this application locally by executing the Python script, and accessing the routes in your web browser or using a tool like curl or Postman.
Remember to fill in your Infura API key, CoinGecko Demo API key and a random Flask secret key in your .env file. Always remember to keep your private keys and API keys secure and never share them with anyone!
Referencing the HTML and ERC-20 Code
The code for this project is quite extensive, involving both HTML for the user interface and ERC-20 token interactions on the Ethereum blockchain. For a detailed view of the code, please refer to the provided Github repository.
The repository contains all the necessary files and instructions to understand the workings of the project. It includes the HTML code for the user interface (templates/index.html), the ERC-20 ABI (erc20_abi.json) and the Python code for interacting with ERC-20 tokens using the Web3 library. The repository serves as a comprehensive guide to understanding and running the project.
Run the Wallet in Web Browser
Let’s run our wallet in the browser, following these steps:
- Save the code in a file named
app.py, next to thetemplates/index.htmlanderc20_abi.jsonfiles from the repository. - Open your terminal or command prompt.
- Navigate to the directory where you saved
app.py. - Run the file by typing the following command and pressing enter:
python app.py - After running the command, you should see an output indicating that your Flask application is running. You can then open your web browser and navigate to
http://localhost:5000to interact with your application. On macOS, if port 5000 is already used by AirPlay Receiver, runPORT=5001 python app.pyand openhttp://localhost:5001instead.
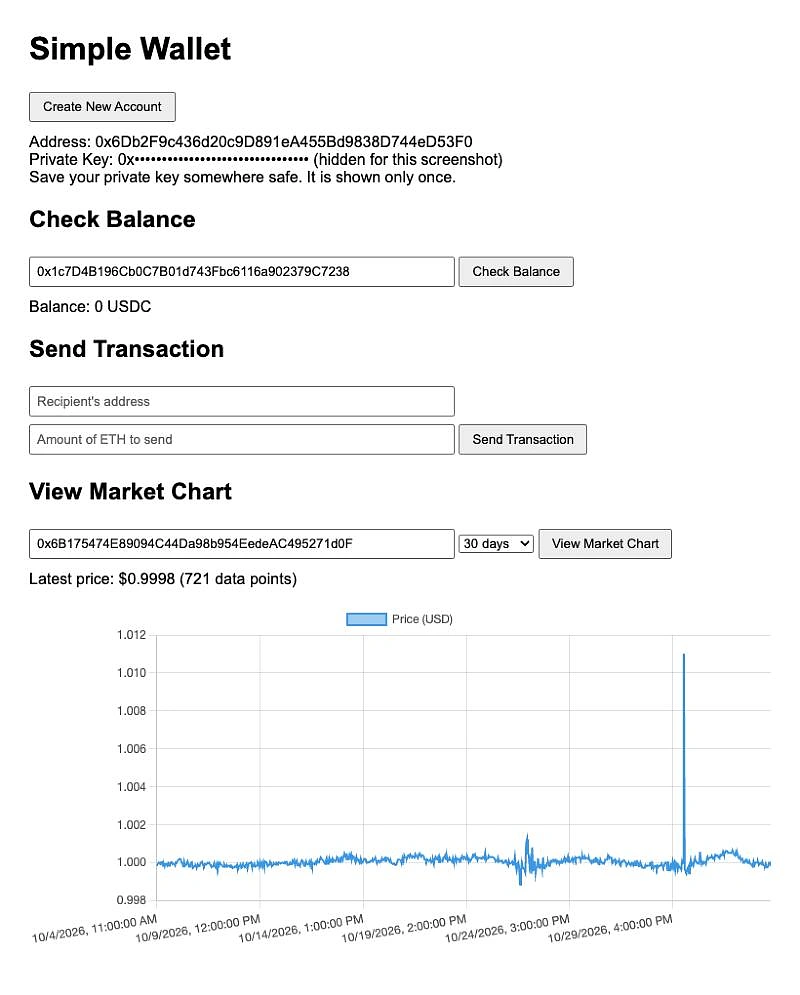
The above program is tested on Sepolia with 0x1c7D4B196Cb0C7B01d743Fbc6116a902379C7238, the contract address for USDC on Sepolia. The balance displayed is 0, indicating the newly created account doesn’t hold any USDC. The market chart is tested with 0x6B175474E89094C44Da98b954EedeAC495271d0F, the Ethereum mainnet contract address for DAI Stablecoin. The market chart data is displayed using CoinGecko API and represents the price history of DAI in USD.
For transactions, the user can enter the recipient’s address and the amount of Ether to be sent. When the Send Transaction button is clicked, a POST request is made to the /send_transaction endpoint with the recipient’s address and the amount as JSON data. Fund the new address with Sepolia ETH from a faucet first, then track the returned transaction hash on Sepolia Etherscan.
Advanced Crypto Wallet Functionality and Further Considerations
While this guide covers only basic crypto wallet development, developers who might want to expand wallet functionalities can consider the following:
- Token Swapping: Implement functionality to swap one type of token for another. This could involve integrating with a decentralized exchange protocol like Uniswap or SushiSwap.
- Staking and Yield Farming: Allow users to stake their tokens or provide liquidity to earn rewards. This would involve interacting with various DeFi protocols.
- NFT Support: Expand the wallet to support Non-Fungible Tokens (NFTs). This would allow users to hold and transfer unique digital assets.
- Portfolio Value and PnL: Show every token the wallet holds with its USD value, plus trades, transfers and profit and loss, using CoinGecko API’s onchain wallet endpoints (Analyst plan and above), instead of calling each token contract one by one.
Additionally, another use-case would be to build a crypto dashboard with functionalities like:
-
Crypto Price Alerts: Notify the user when the price of a crypto asset reaches a certain level and display it on the dashboard using the
/simple/priceendpoint, or receive a push notification when a top-100 coin makes a significant price move with CoinGecko webhooks (Basic plan and above). -
Crypto News and Trends: Display the latest news, trending coins, and popular categories from the crypto space on the dashboard using the
/news(Analyst plan and above),/search/trendingand/coins/categoriesendpoints. -
Crypto Market Data: Provide the user with various market data such as market cap, volume, dominance, and the Crypto Fear & Greed Index on the dashboard using the
/globaland/coins/marketsendpoints.
You can also use a library like Plotly or Dash to create interactive charts and graphs for your dashboard.
Remember, developing advanced features requires a deep understanding of Ethereum, smart contracts, and the various protocols you’ll be interacting with. Always prioritize the security of your users’ funds and adhere to best practices in the blockchain industry.
Conclusion
Building a basic crypto wallet for the Ethereum network using the Web3 Python library and CoinGecko API is a great way to understand and analyze how blockchain transactions work. This wallet can serve as a foundation for more complex applications, such as wallets with staking or swapping features, support multiple networks, or display NFT data.
Crypto developers and projects who want access to more API endpoints and greater data depth may consider subscribing to the CoinGecko Analyst API.

Interested in more API resources? This extensive DEX Data API guide will walk you through how to get market data for a liquidity pool, access onchain data for DEX-traded tokens and more.




 Or check it out in the app stores


