
In today's tutorial, we'll cover how to build a DeFAI crypto Discord bot using SendAI's Solana Agent Kit. With this bot, users can easily perform on-chain tasks like checking crypto prices and market stats, tracking their wallet balances and sending tokens to other users.
As usual, we’ll include a GitHub Repository link with an example implementation at the end of the article.
What is DeFAI? (Decentralized Finance Artificial Intelligence)
DeFAI (Decentralized Finance + Artificial Intelligence) refers to AI-powered agents that interact or integrate with DeFi protocols to enhance efficiency. These AI agents can execute complex on-chain actions—such as swapping and creating tokens, fetching market data, and sending tokens, all using text-based prompts.
This helps to simplify the often complex processes that revolve around interacting with on-chain protocols.
Now, let’s dive in and create our own Discord DeFAI agent!
Requirements
Here’s what you’ll need to follow along with this guide:
- A CoinGecko API Key
- A Discord Server
- A Discord Bot Token
- Node.js 22.14.0 + npm (or pnpm)
- A Solana Wallet Private Key
- An RPC Gateway
- An OpenAI API Key
- Perplexity Key
Creating a Discord Server
Log in to your discord account and click the plus (+) sign on the bottom left of your server sidebar. Choose a name for your server and hit Create.
Creating a Discord Bot
On Discord, we must first create an application and define its scope before creating a bot. To do this, navigate to the developer dashboard and hit New Application in the top right corner.
Give your bot a name and now under Bot hit Reset Token. We’ll need this token to authenticate with the bot within our application, so just store it in a safe place for now.
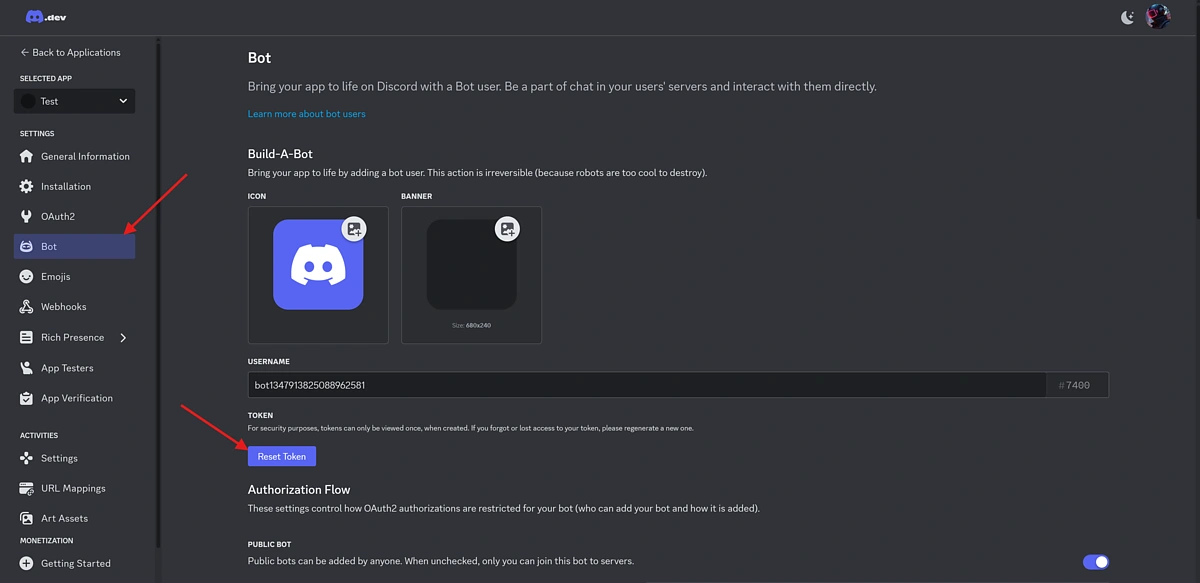
Next, we need to define our bot's scope and invite it into our server. Under Bot scroll down until you reach Bot Permissions.
Here is where you’ll define the various privileges that the bot will request when joining a server. Make sure to select only required scopes, as selecting everything could put your server at risk. For a conversational bot, we just need it to be able to Read Message History and Send Messages.
Immediately underneath this section, you’ll see a value called Permissions Integer.

Make a note of this as we’ll need it to invite our bot into the server with the correct permissions. To invite the bot into your server, navigate to the Installation section and start by copying the Install Link.
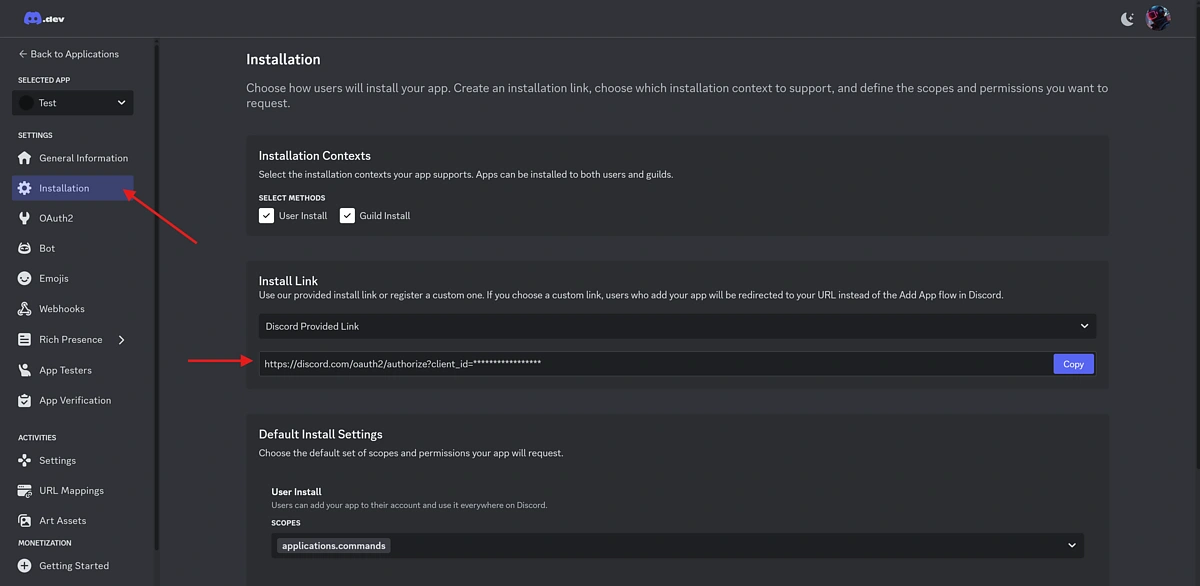
Before pasting the URL into your browser, you will need to append the following parameters: &permissions and &scope, where permissions represent the Permissions Integer you copied earlier and the scope represents the application type, in this instance that would be a bot.
Your final URL should look similar to this:
https://discord.com/oauth2/authorize?client_id=1111111111111111111&permisisons=67584&scope=bot
Paste this in your browser, and you will be redirected to the Discord App to approve and add your bot to your server.
Now that Discord is sorted, let’s go through the remaining technical requirements.
Installing Node
The easiest way to install node.js is to open a new console or terminal window and type in the corresponding commands for your operating system:
How do I find my crypto API key?
To obtain your CoinGecko API key, head over to the Developer’s Dashboard and click on +Add New Key in the top right corner. You can update and manage your API keys from the dashboard. In the event your key is compromised, you may delete it by clicking the "Delete Key" button.
For full details on generating and setting up your key, refer to this guide.
The AI agent will rely on the CoinGecko API to retrieve price or token information, so it’s highly recommended that you have a key on hand.

Creating the Project Environment
Start by creating an empty directory and initializing a new Node project:
Next, we’re going to install the packages required for our application to run, as well as initalize the Typescript settings.
Now that the project environment is configured, go ahead and create an empty .env file, and drop the API, wallet private key and RPC URL that you created in the previous step:
Initializing the AI Agent on Discord
To set up our DeFAI Agent, we’ll leverage the Solana Agent Kit from SendAI, which streamlines the process of building and managing AI agents.
This toolkit removes much of the complexity by handling chat history storage and retrieval automatically, so we don’t have to manage it manually. It also provides a built-in function-calling system, capable of performing multiple on-chain and off-chain actions.
To get started, create a new file in your project’s root directory called agent.ts. This file will define and export our AI Agent, making it accessible throughout the codebase.
This setup initializes our AI Agent and it ensures the Solana private key is properly formatted before creating a SolanaAgentKit instance, which provides access to blockchain and API services like CoinGecko.
The initializeAgent() function sets up an AI model using OpenAI’s GPT-4o, enables memory storage, configures Solana-specific tools, and exports the agent for us to use in our application.
How to Set Up Your Discord DeFAI Bot
Now that we have a way of creating an agent, we need to initialize it and pass messages to and from Discord. One easy way to do this is use the discord.js package that we installed earlier.
Let’s start by creating a new file called index.ts. This will be the entry point of our application. We’ll then import the necessary libraries and load the dotenv.
Next, we define the type for our agent and initialize the Discord client, which will help us manage messages to and from the server.
We’ll initialize our Discord bot, ensuring that when it starts, a message confirming a successful login is logged to the console. At the same time, we’ll also initialize our DeFAI agent, which should only be set up once per bot session.
This is crucial because the agent retains conversational memory throughout the session. Since its context and memory reset with each initialization, it’s important to be mindful of when and how it’s instantiated.
Now, all that's left to do is handle our bot’s behavior and the interaction between Discord user messages and the DeFAI bot messages.
Here, we listen for messages in a Discord server and process user commands that start with “!”. When a message is received, we first ensure that it isn't from a bot and that it begins with the command prefix.
We then extract the user’s input, set up a configuration with the Discord channel ID, and check if the AI agent is available. If the agent hasn’t been initialized yet, we will notify the user to try again later.
Once the agent is ready, we acknowledge the request with a response and a typing indicator before streaming the AI-generated reply. The message is processed in chunks, and each chunk is sent as a reply in real-time. If an error occurs during processing, we log it and notify the user that their request couldn't be completed.
Finally, let’s log into the Discord client and start our bot:
To execute the code, simply run ts-node index.ts (or npx ts-node index.ts) from the root directory.
The bot will take a few seconds to initialize so wait for the following log before sending commands from Discord: Logged in as YourBotName#1111!
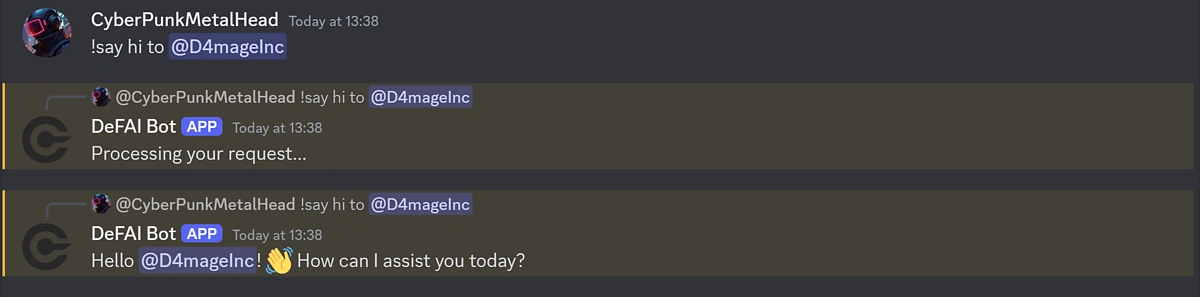
Once the bot has initialized, you may communicate with it using natural language, as you would with any other LLM, but remember to prepend an exclamation mark (!) to every message meant for the DeFAI bot.
DeFAI Bot Examples and Use Cases
ChatBot
For this bot, you don’t need to use specific commands. This means its use cases are limited by the level of permission that the bot has on the server and the built-in functions on the Solana Agent Kit.
For starters, here’s an example of me asking it to greet a user:
Naturally, the best use cases are the on-chain ones so let’s explore these.
Send Crypto to Users
One use case for the Agent Kit is setting up community rewards and incentives. While there are multiple ways to achieve this, a simple approach is to track wallet addresses and use your Discord DeFAI agent to distribute giveaways and rewards seamlessly.
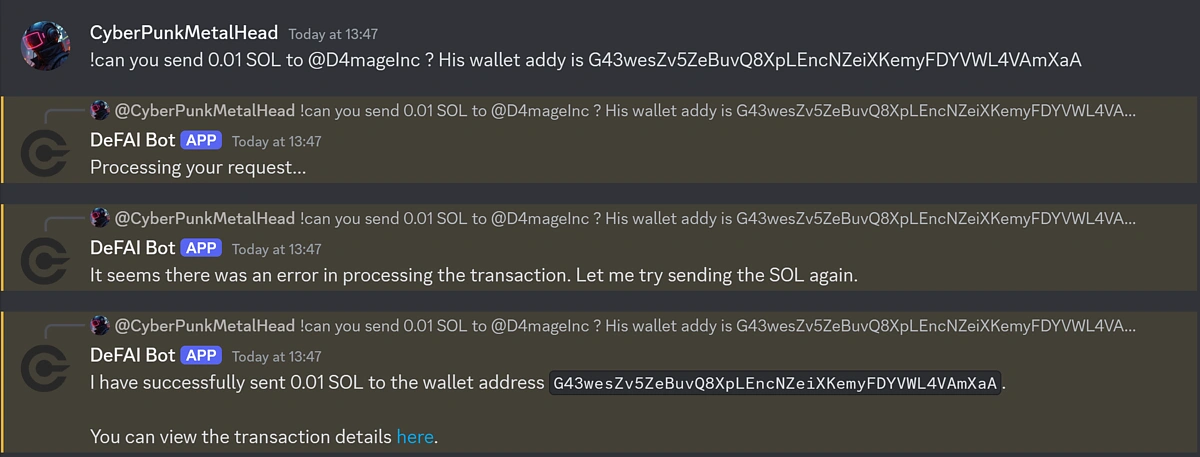
Sometimes, the bot reaches the desired outcome through trial and error. Since the Agent has access to multiple functions within the Solana ecosystem, it may occasionally struggle to determine the exact action to take or how to structure a request correctly.
In these cases, the bot will retry the action, prompting itself to correct any mistakes. While this tool only displays the agent responses, every time a function call is made, a corresponding tools response is also generated. This is useful for logging and debugging in the console but should be avoided in Discord replies, as it can make responses overly long and cluttered.
Track User Rewards and Transactions
Another use case for a DeFAI bot is keeping track of transactions and rewards distributed within the community. Note that sometimes the tool might get a bit confused about the information it knows, and I found that reminding it of it usually does the trick.
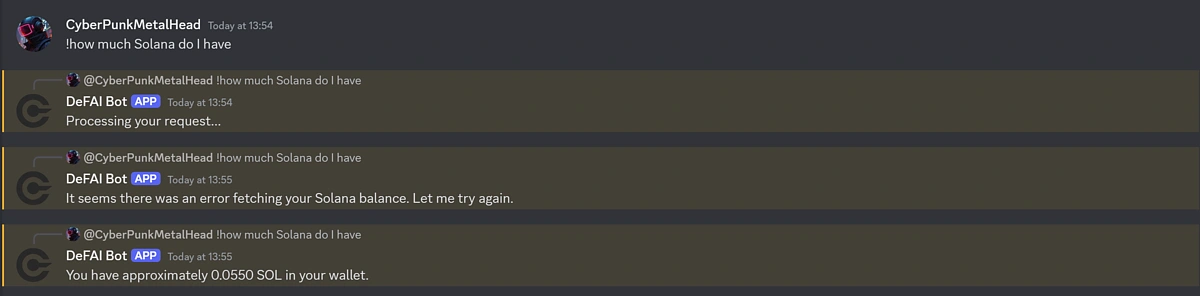
This has been tested on GPT-4o, so you may be getting better results by switching to o1 instead.
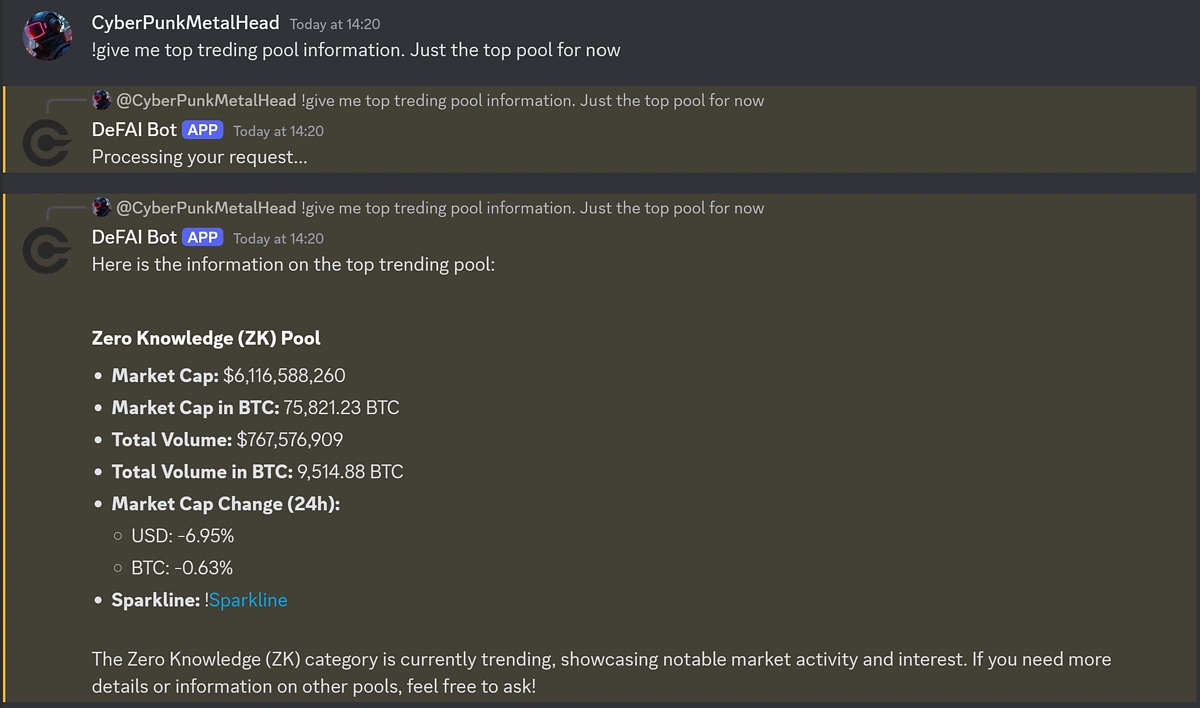
Get Pool Information
The DeFAI agent can also help us identify current trending Pools and Topics, through CoinGecko API's on-chain DEX data.
Considerations
When deploying a Discord DeFAI bot using tools like SendAI’s Solana Agent Kit, prioritize security, scalability, and community engagement.
First, consider restricting the bot’s command access to authorized users by implementing role-based permissions or channel-specific restrictions. Avoid allowing unrestricted use of sensitive actions like swaps or transfers, which could lead to abuse.
For wallet security, use a dedicated wallet with minimal funds instead of your primary wallet, and store its private key securely in encrypted environments. Never expose keys in code or public channels. To enhance community engagement, enable server metrics permissions to track user activity and automate rewards for active members. Pair this with transparent rules to foster trust.
Another important point to keep in mind is the bot’s context. Since its memory resets on every initialization, an external database may be used to persist the context and feed it back to the tool as and when needed.
Finally, always remember to monitor API rate limits for the third-party tools that you have authenticated with, to avoid disruptions and creeping costs.
As promised, here is a working example of a Discord implementation that you can test right now or use as a boilerplate to further customize this tool to fit your own use case.
If you liked this article, you might like to learn more about building an AI assistant to track your profit and loss.


 Or check it out in the app stores

