
Trading on a decentralized exchange (DEX) such as Uniswap is fundamentally different when compared to a centralized exchange (CEX) such as Coinbase or Binance. Users on a DEX connect with their crypto wallets and interact directly with a smart contract, in order to swap different tokens on a given network. The most widely used DEXs are based on the Automated Market Maker (AMM) model, where users can access liquidity via a pool. Swapping of tokens occurs in a pool, and is subject to a fee as defined in the smart contract. A number of high liquidity pools can thus exist for the same trading pair, sometimes differing only in the fee.
Although DEXs have become quite popular recently, they often lack the user-friendly monitoring interface of CEXs. Users also need to manually connect to a DEX using their own wallets, which adds additional complexity especially when executing multiple trades. It is therefore useful to use DEX APIs to automate the monitoring and execution of trades.
In this tutorial, we will learn how to leverage the on-chain DEX endpoints in CoinGecko API to monitor trading activity on various pools. Additionally, we will use Python to monitor balance in our crypto wallet, and execute swapping trades on a DEX, such as Uniswap.
Let’s get started!
Prerequisites
We will make use of a Jupyter notebook as our primary development environment. Additionally, the following package needs to be installed:
pip install uniswap
To start coding in a new notebook, execute the following command in the terminal:
jupyter lab
This should open a new tab in a browser. If you want to make use of the notebook shared via the GitHub repository, clone the repository first, and then open it within the Jupyter environment. Be sure to replace the paths to the API key files with your own.
You will also require a crypto wallet that supports ERC-20 (Ethereum) tokens. MetaMask is easy to set up as a browser extension and is therefore recommended. We will later use the account address and the primary key generated from within MetaMask. To view the primary key, click on the three dots (top right) that are visible when looking at an account summary. Select ‘Account details’ and then click on ‘Show primary key’. You will be prompted to enter the wallet password, and then hold the reveal button.
Once the primary key is visible, copy it to a file and save it locally in the following JSON format:
{ “primary_key” : “XXYYZZ”}
Lastly, we will need a RPC endpoint to interact with the Ethereum blockchain. We can make use of the free RPC endpoint provided by Ankr: https://rpc.ankr.com/eth
Although this endpoint is rate-limited, it’s sufficient for our demo use case. If you need higher rate limits, consider switching to their paid plan. Another option is to use the free plan from Infura, which provides a single API key and a generous amount of daily credits.
CoinGecko API On-chain Endpoints
We will be using the following on-chain DEX endpoints, which are accessible on all CoinGecko API paid plans:
- /onchain/networks/{network}/dexes - Get list of supported DEXes for a given network
- /onchain/networks/{network}/trending_pools - Get list of trending pools for a given network
- /onchain/networks/{network}/pools - Get list of top pools for a given network
- /onchain/networks/{network}/dexes/{dex}/pools - Get list of top pools for a given network and DEX
- /onchain/networks/{network}/pools/{pool_address} - Get pool data for a given network and pool address
- /onchain/networks/{network}/tokens/{token_address}/pools - Get pool data for a given network and token address
I've outlined how to set up your project environment and secure API access in my previous article.
How to Monitor Trending DEX Pools
As trades on a DEX are executed based on liquidity provided by crypto pools, it is crucial to be able to track token activity across various pools to develop a well-informed trading strategy. We will now dive into some examples using CoinGecko API's on-chain DEX data in combination with Python.
Let's start by writing a convenience function, which will help us make an API request.
Next, we will use the following helper function that will generate the proper URL according to the API endpoint needed.
Although many networks are supported, we will primarily focus on “ETH”. Depending on the API being called, other input arguments can be passed to this function.
The response received from CoinGecko API will be parsed into the columns of a pandas DataFrame via the below function:
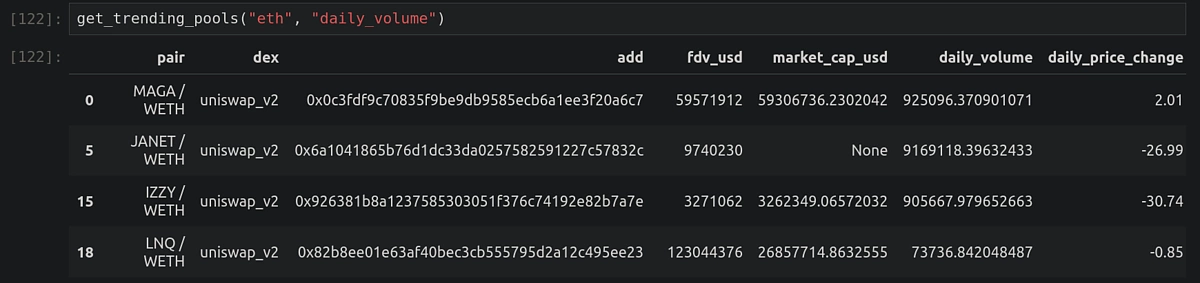
All of the above can now be combined to list the trending pools, sorted by a desired column.
Let’s check the trending pools in decreasing order of “daily_volume”.
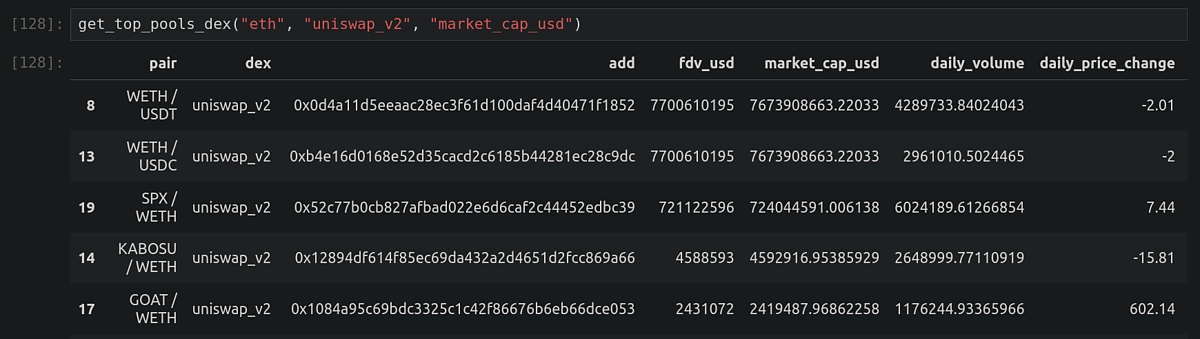
How to Track Top DEX Pools
Similar to the previous example, we can also track the top pools for a specific network.
Let’s list them in the order of decreasing market cap in USD.
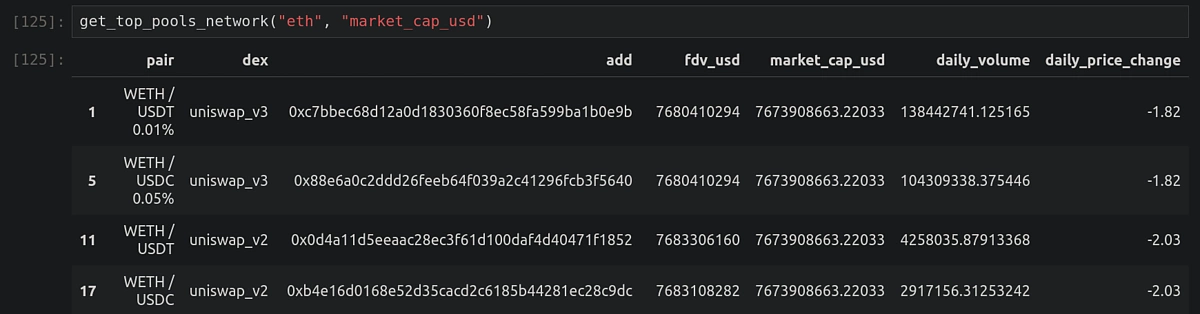
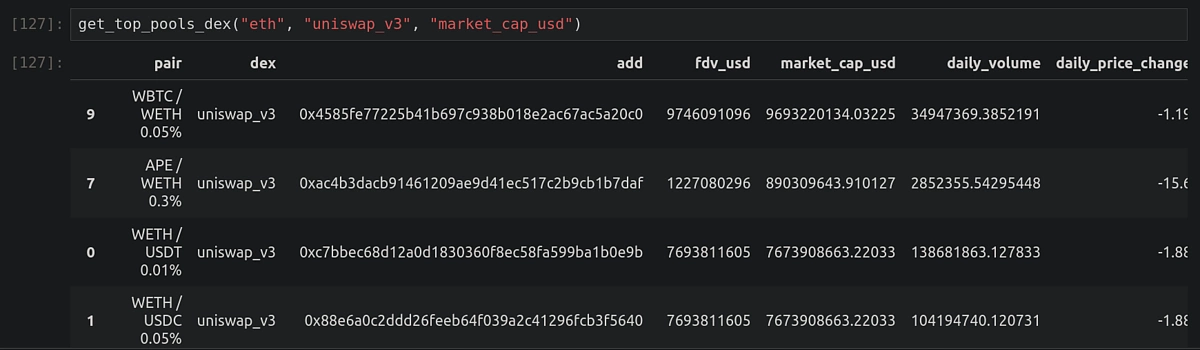
As visible in the example above, Uniswap appears to be a popular DEX. For the same token pair, pools can differ based on the fee implemented usually shown as a % alongside the pair name. It can be handy to see the top pools only for Uniswap. Thankfully, CoinGecko API has an endpoint for this! We make use of this endpoint in the next example, where a specific DEX can be supplied as an input parameter.
Now we can easily compare some of the top pools (listed by decreasing market cap) between “uniswap_v2” and “uniswap_v3”.
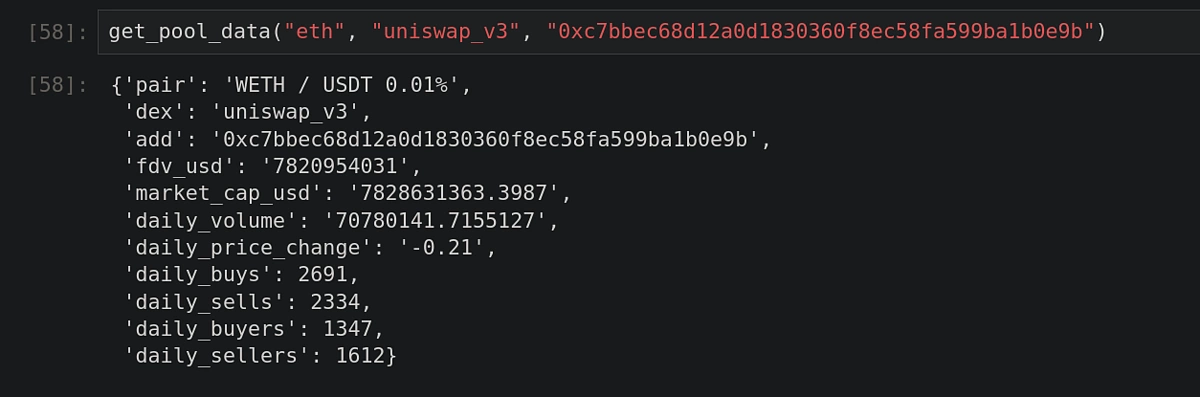
How to Get Data for a Specific Pool Address
Sometimes, it can be useful to investigate a specific pool to determine more useful metrics related to its daily activity. Using a pool address as an additional input, the following functions can be used to gain further insight:
How to Monitor Prices for a Given Token
Until now, we have looked at and compared various aggregated metrics across different pools. However, we need to also compare the token price data. This can allow users to develop and test arbitrage strategies across different pools.
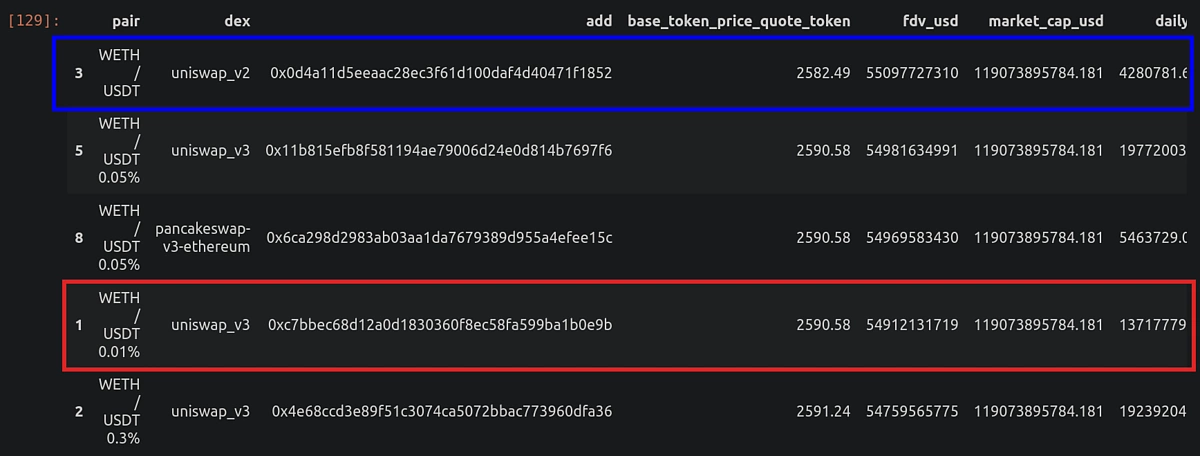
Tokens are usually categorized as base and quote. On the ETH/USDT pool as an example, ETH will be the base token and USDT will be the quote token. We are interested in knowing the ETH to USDT conversion price, which is reflected in the “base_token_price_quote_token” field below:
The rest of this article will also make use of the token contract address, which uniquely represents the token on its native blockchain. This can be found by visiting the pool summary page on a DEX. For example, we can find the USDT token contract address at the bottom left (“Links” panel) of the Uniswap pool summary page as shown below:

Using the token contract address as input, we can use the below function to fetch the list of top pools for a given network and token address.
Note that Uniswap uses WETH (Wrapped Ethereum), which is a tokenized form of ETH used to interact with dApps. Hence, the trading pair name contains WETH. We will filter the output from the above function to list only rows with “WETH /” in the name. Also, the rows can be sorted by “base_token_price_quote_token”.
|
|

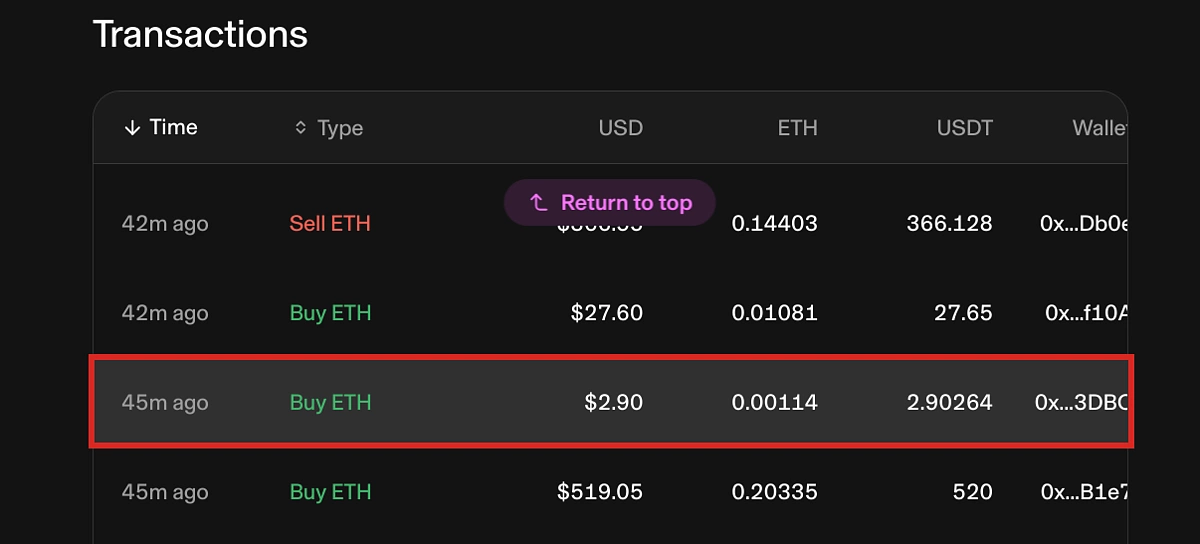
The above list provides a clear overview of arbitrage opportunities—not only across different DEXs but also across different versions of the same DEX (Uniswap v2, v3 etc). Next, we will learn how to execute swapping trades on Uniswap using Python. For this, we will target the highlighted pool (red) to sell some ETH and get USDT. Then we will target a pool with a lower price (blue) to potentially buy back same amount of ETH for a lower amount of USDT.
Algorithmic Trading: How to Swap Tokens on Uniswap
We will interact with the Uniswap protocol using the Uniswap Python Library, which provides various convenient functions to check prices and execute swap trades. This is extremely handy since much of the web3 implementation is abstracted away from the end user. Moreover, it can also be used to monitor the balance in the user’s wallet address.
As discussed earlier in this article, to trade using a wallet address, the associated primary key will need to be provided. This can be saved in a file locally, and then read as shown below:
# Get wallet private key

def get_private_key():

    f = open("/home/vikas/Documents/MetaMask_private_key.json")

    key_dict = json.load(f)

    return key_dict["private_key"]
Next, the Uniswap class needs to be set up:
The contract addresses (as discussed before) for relevant tokens are also needed.
# Token contract address

https://support.uniswap.org/hc/en-us/articles/26757826138637-What-is-a-token-contract-address

eth = "0x0000000000000000000000000000000000000000"

usdt = "0xdAC17F958D2ee523a2206206994597C13D831ec7"
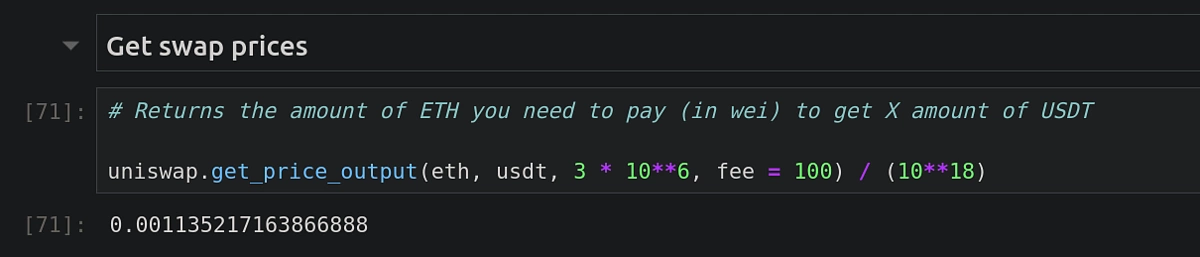
The function get_price_output returns the amount of ETH (in wei) that you need to get X amount of USDT after a swap. Note that since 1 ETH = 10¹⁸ wei, we divide the output accordingly to convert the result back to ETH. In the following example, we want to know how much ETH will be swapped to get 3 USDT. The arguments are in the smallest unit of the token, which is why USDT input will be 3 x 10⁶. Fee = 100 will ensure that a pool with 0.01 % fee will be used. For Uniswap v3, it is recommended to first research various pools and pick the one with the optimum balance between low fee and high liquidity.
uniswap.get_price_output(eth, usdt, 3 * 106, fee = 100) / (1018)
Decimals for common tokens:
- ETH, DAI, UNI, BAT, LINK use 18 decimals
- WBTC uses 8 decimals
- USDC, USDT uses 6 decimals
Number of decimals can always be looked up on Etherscan.
To execute the above swap, we call the make_trade_output function with the same set of arguments as above.
uniswap.make_trade_output(eth, usdt, 3 * 10**6, fee = 100)
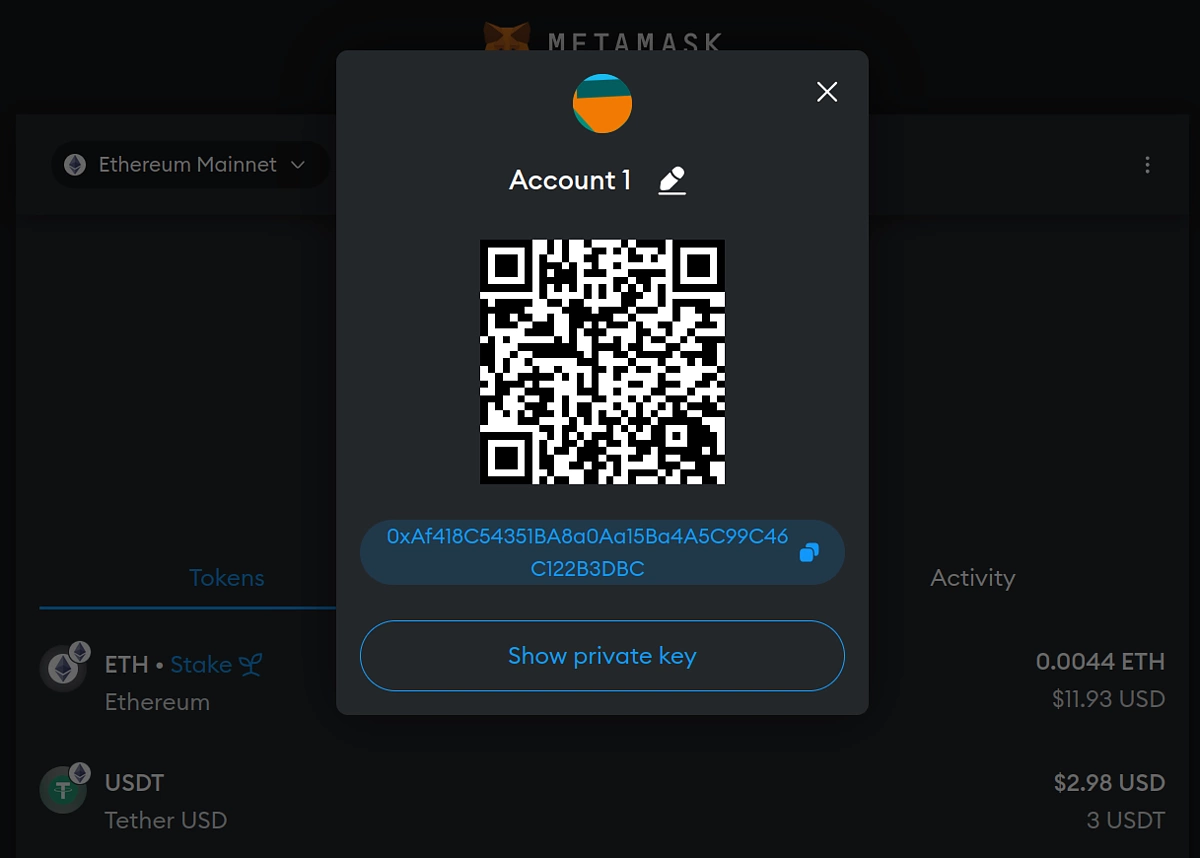
To check the wallet balance, the following functions are used:
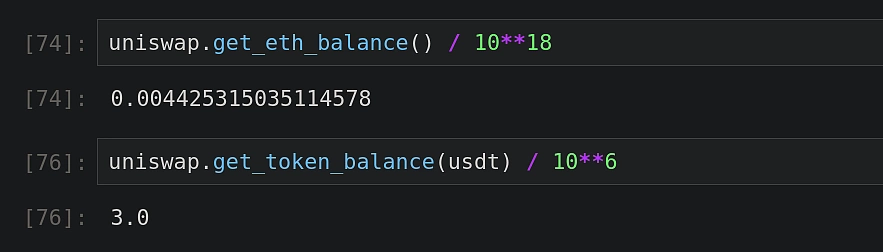
The above data is consistent with the view on MetaMask wallet as shown below.
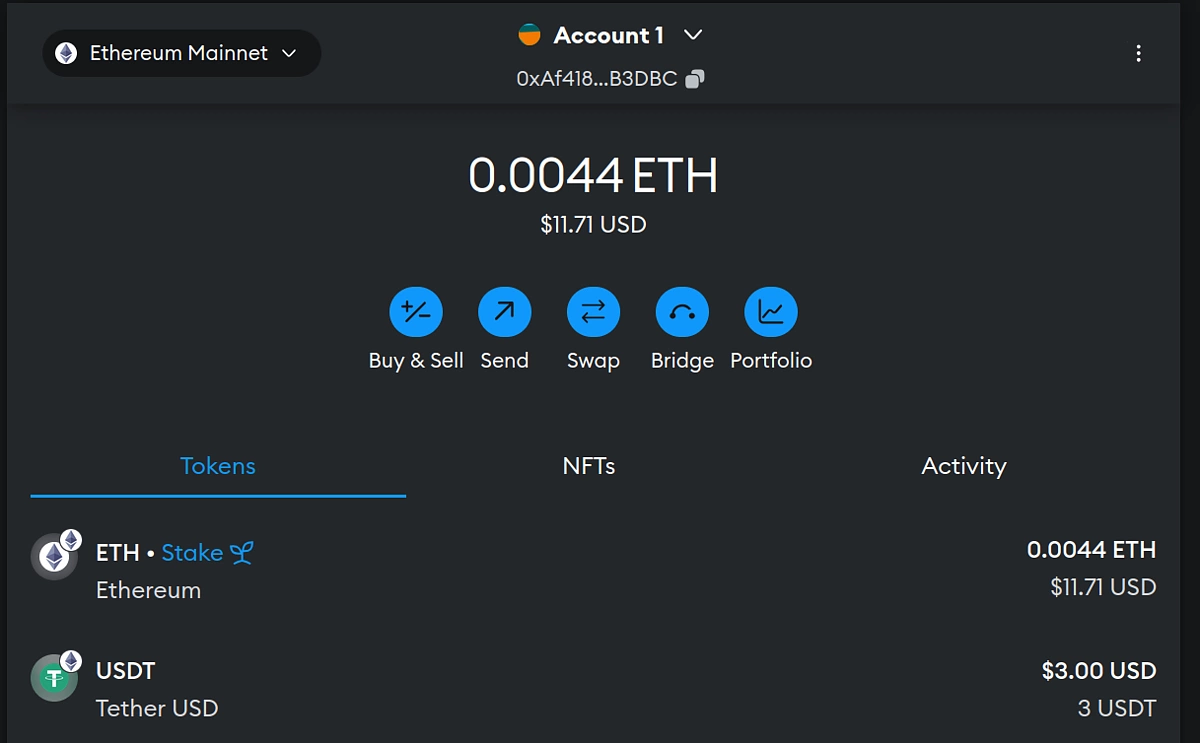
Also, we can confirm that the expected number of USDT tokens (= 3) have been received. The transaction will also appear on Uniswap’s web interface within the target pool.
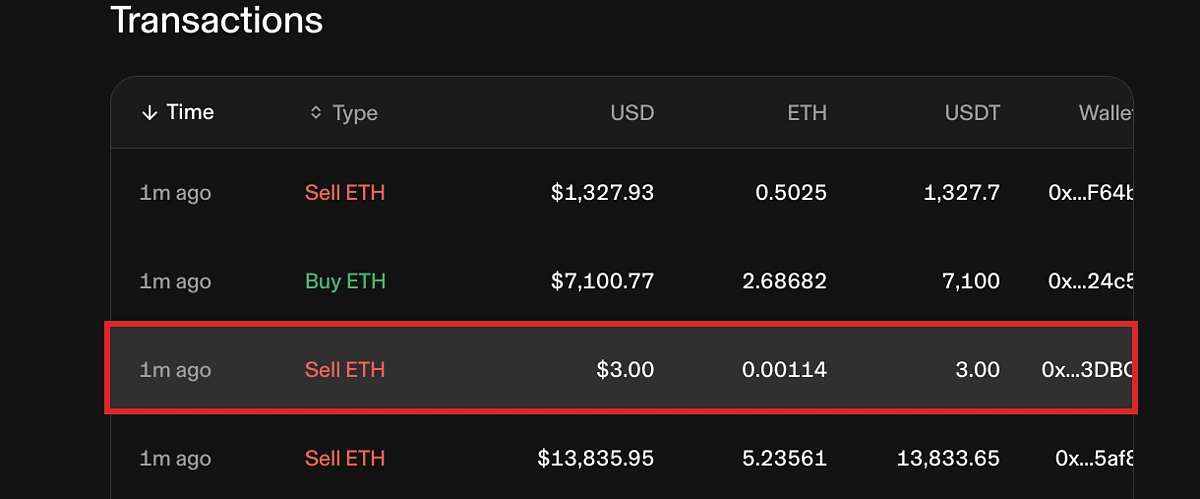
Looking up the wallet address on Etherscan, we can see more details about the transaction. Remember that Uniswap makes use of WETH. However, we initially started off with ETH in our wallet. Hence, the swapping route to USDT first includes a transfer to WETH.

Next, we will attempt to buy back the same amount of ETH (~ 0.001135) using USDT. This time, our target will be the pool highlighted in blue.
Note that this pool is on v2 of the Uniswap protocol, so we need to update the version (= 2) in the definition of the Uniswap class. We can now check how much USDT will be needed for this swap. The input ETH amount (in wei) needs to be an integer. Fee argument is not used here since this is the only pool on v2.

Compared to the previous swap, less USDT is needed to buy back the same amount of ETH. This was expected since the ETH price (in USDT) is lower in this pool. However, it’s important to keep in mind that since these swaps are on-chain transactions, they also consume gas. Gas prices can change over time depending on network congestion. Therefore, any potential gains need to be carefully offset by accounting for variations in the transaction costs.
To execute the swap, we apply the same function as before.

The output is the transaction hash, which can be verified on Etherscan. A brief summary is available in the “Transaction Action” section.

More details on the swapping route can be found by scrolling further below:

The transaction also appears on the pool summary page on Uniswap.
Conclusion
In this article, we learnt how to monitor trading activity on various DEX pools using the combination of CoinGecko API's on-chain DEX data and Python. Using the Uniswap as an example, we demonstrated how to programmatically swap tokens on different pools, potentially targeting arbitrage opportunities. Taking a step further, we also validated the transactions on Uniswap and Etherscan, thus making sure that the swapping route matches our expectations.
The scripts presented here can help traders simplify and automate their trading strategies, starting with wallet balance tracking and extending to executing token swaps on a DEX.
If algorithmic trading interests you, be sure to check out our other Python guides, which cover building a crypto arbitrage bot and developing a crypto trading algorithm using a neural network!


 Or check it out in the app stores

